
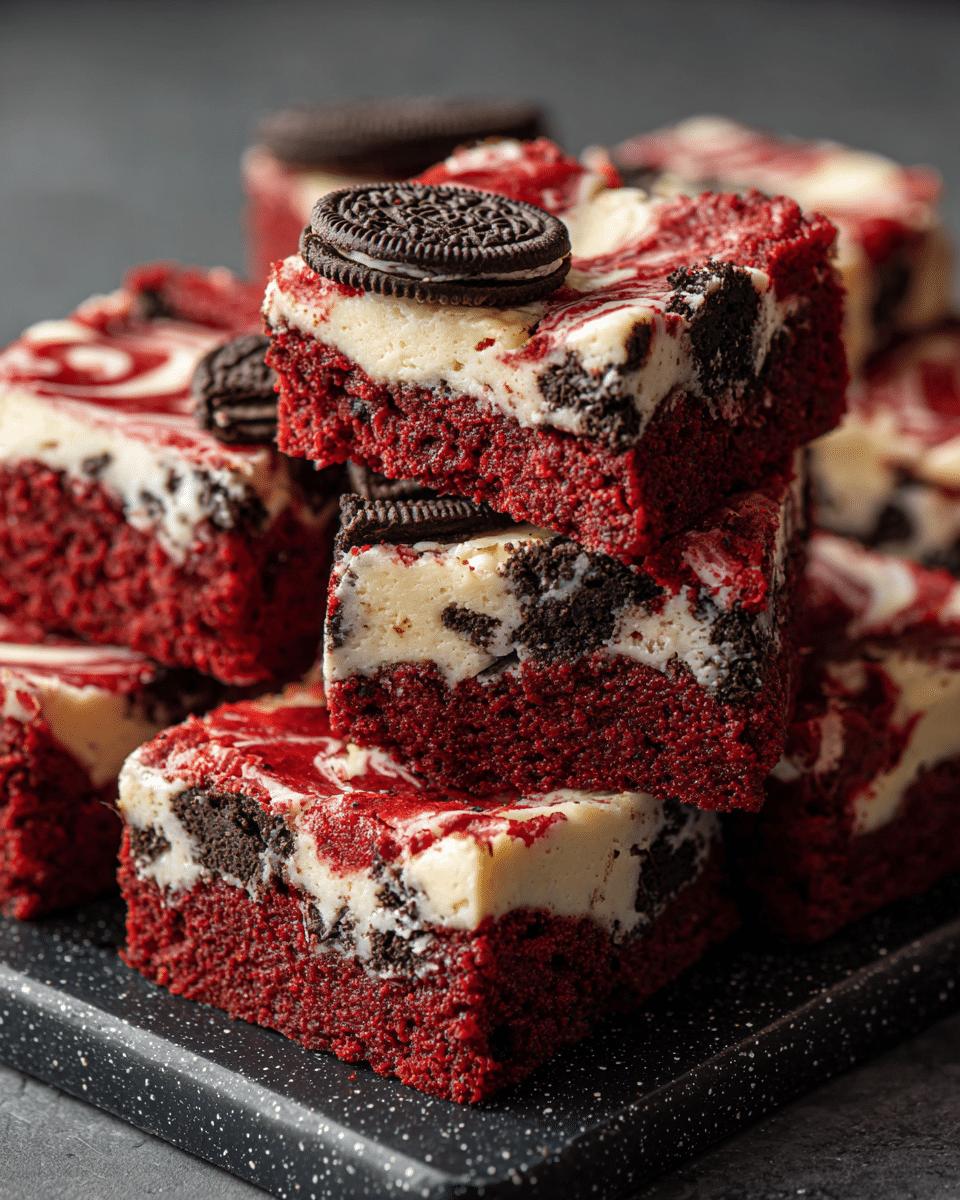
Red Velvet Cream Cheese Brownies combine the fudgy richness of a classic brownie with the tangy silkiness of cream cheese swirl—all wrapped in the stunning red hue that makes them a visual showstopper. These brownies are more than a treat—they’re a celebration, perfect for gifting to moms on Mother’s Day, graduates, or anyone who considers chocolate their love language.
Whether you’re baking a batch to wrap up in ribbons or slicing them to serve at your next brunch or party, these swirled beauties are as satisfying to look at as they are to eat. And if you’re an Oreo or cream cheese brownie fan, don’t worry—we’ll include mouthwatering variations, too.
Brownies with a Bold Twist
Red velvet desserts carry a certain romance—classic, luxurious, and just a little unexpected. Combining the flavor of mild cocoa, a subtle tang, and that signature red color, red velvet started as a cake icon and has since evolved into cupcakes, cookies, and yes—brownies.
This version swirls a rich red velvet brownie batter with a creamy cheesecake layer, offering contrast in both color and flavor. You get the chew and depth of chocolate plus the smooth, slightly tangy bite of cream cheese in every square.
The best part? These brownies are easy to make and slice beautifully, making them perfect for:
-
Mother’s Day gift boxes
-
Graduation dessert trays
-
Chocolate lovers’ bundles
-
Holiday cookie swaps
-
Oreo brownie mashups
Let’s walk through how to make them, then explore variations like Oreo-stuffed and cream cheese-layered brownies that are perfect for packaging or parties.
Ingredients Overview: Red, Rich, and Ready to Swirl
These brownies use simple pantry staples, elevated with a few key ingredients for richness and color.
Red Velvet Brownie Base
-
All-Purpose Flour: Just enough to bind the batter without drying it out.
-
Unsweetened Cocoa Powder: Red velvet needs a hint of cocoa—not too much—to keep its color and flavor balance.
-
Granulated Sugar: Provides structure and sweetness.
-
Salt: Balances the sweetness and highlights the cocoa.
-
Unsalted Butter: Adds richness and helps create a moist, dense crumb.
-
Eggs: Bind everything and help the brownie set.
-
Vanilla Extract: Boosts overall flavor.
-
Red Gel Food Coloring: Gives that signature red hue without watering down the batter.
-
White Vinegar: A small amount reacts with cocoa for that classic red velvet tang.
Cream Cheese Swirl
-
Cream Cheese (block-style): Full-fat for the smoothest swirl. Softened to room temperature.
-
Granulated Sugar: Sweetens the cream cheese just enough.
-
Egg Yolk: Helps the swirl set while baking.
-
Vanilla Extract: Adds warmth and rounds out the flavor.
Step-by-Step Instructions: Layer, Swirl, and Bake
Step 1: Prep the Pan
-
Preheat oven to 350°F (175°C).
-
Line an 8×8-inch baking pan with parchment paper, leaving overhang on the sides for easy removal.
Step 2: Make the Red Velvet Brownie Batter
-
In a microwave-safe bowl or saucepan, melt ½ cup (1 stick) unsalted butter. Let cool slightly.
-
Stir in:
-
1 cup granulated sugar
-
2 large eggs
-
1 tsp vanilla extract
-
1 tbsp red gel food coloring
-
1 tsp white vinegar
-
-
In a separate bowl, whisk together:
-
¾ cup all-purpose flour
-
¼ cup unsweetened cocoa powder
-
¼ tsp salt
-
-
Combine the wet and dry ingredients and mix until smooth. Set aside ¼ cup of the batter for the top swirl.
Step 3: Make the Cream Cheese Mixture
-
In a medium bowl, beat:
-
8 oz cream cheese (softened)
-
¼ cup granulated sugar
-
1 egg yolk
-
½ tsp vanilla extract
Beat until smooth and creamy.
-
Step 4: Assemble and Swirl
-
Pour the main brownie batter into the prepared pan and smooth it evenly.
-
Spoon the cream cheese mixture over the top in dollops.
-
Drizzle the reserved ¼ cup red velvet batter over the top.
-
Use a butter knife or skewer to gently swirl the layers—go for a marbled look, not a mix.
Step 5: Bake
-
Bake for 28–32 minutes, or until the edges are set and the center is just slightly jiggly.
-
Cool in the pan for 30 minutes, then lift out using the parchment. Chill for 1 hour before slicing for clean edges.
Tips, Variations, and Substitutions
Tips for the Best Brownies
-
Use gel food coloring for a vibrant hue without thinning your batter.
-
Don’t over-swirl—you want visible ribbons of cream cheese.
-
Cool completely before slicing for tidy squares and better texture.
Variations to Try
Oreo Red Velvet Cream Cheese Brownies
-
Stir crushed Oreos (about ½ cup) into the red velvet batter.
-
Press whole mini Oreos on top before baking for a fun texture.
Classic Cream Cheese Brownies (No Red Velvet)
-
Omit red food coloring and vinegar.
-
Double the cocoa powder (½ cup total) for a rich chocolate base.
Triple Chocolate Cream Cheese Brownies
-
Add ½ cup chocolate chips to the brownie batter.
-
Swirl cream cheese filling and drizzle with melted chocolate after baking.
Substitutions
-
Gluten-Free: Use a 1:1 gluten-free baking flour blend.
-
Dairy-Free: Use plant-based butter and dairy-free cream cheese.
-
No Food Coloring: Leave it out for a more natural cocoa-colored brownie.
Serving Ideas & Gifting Occasions
-
Mother’s Day Boxes: Wrap squares in parchment and tie with twine.
-
Graduation Gifts: Stack brownies in a mason jar or dessert box.
-
Brownie Lover’s Tray: Combine with Oreo brownies, peanut butter swirl brownies, and espresso brownies for variety.
-
Holiday Cookie Swaps: Cut into mini bites and package with a red and white ribbon.
Serve chilled for firmer texture or slightly warm for a gooey experience. Pairs perfectly with black coffee or a scoop of vanilla ice cream.
Nutritional & Health Notes
These brownies are an indulgent treat, rich in cocoa, butter, and cream cheese. Portion control is key—one square satisfies a serious sweet tooth.
Approximate Per Square (1 of 9):
-
Calories: 320–360
-
Fat: 21g
-
Carbohydrates: 32g
-
Sugar: 22g
-
Protein: 4g
-
Fiber: 1g
To reduce sugar or fat, try using light cream cheese or replace half the butter with Greek yogurt.
Frequently Asked Questions
1. Do I have to use red food coloring?
No, the food coloring is just for visual appeal. If you skip it, you’ll get delicious cream cheese swirl brownies with a mild cocoa base.
2. Can I double the recipe for a 9×13 pan?
Yes! Double all ingredients and bake in a 9×13-inch pan for about 35–40 minutes. Watch for doneness in the center.
3. How do I store these brownies?
Store in an airtight container in the fridge for up to 5 days. Let come to room temp before serving for the best texture.
4. Can I freeze red velvet cream cheese brownies?
Yes. Wrap individually in plastic wrap and store in a freezer bag. Freeze for up to 2 months. Thaw in the fridge overnight.
5. Why is there vinegar in red velvet brownies?
Vinegar enhances the red color and reacts with cocoa to provide a subtle tang that’s characteristic of red velvet desserts.
6. Can I make these brownies without a mixer?
Absolutely. As long as your cream cheese is soft, everything can be mixed by hand with a whisk or spatula.
7. Are these brownies more cakey or fudgy?
They lean fudgy thanks to the butter and low flour content, but they’re not overly dense—just rich and creamy from the swirl.
PrintRed Velvet Brownie Mix Hack – Easy, Fancy & Deliciously Gooey
Decadent red velvet brownies swirled with a rich cream cheese layer. Perfect for chocolate lovers, gifting, and holiday treats.
- Prep Time: 20 minutes
- Cook Time: 30 minutes
- Total Time: 50 minutes
- Yield: 9 squares 1x
Ingredients
Red Velvet Brownies:
-
½ cup unsalted butter, melted
-
1 cup granulated sugar
-
2 large eggs
-
1 tbsp red gel food coloring
-
1 tsp vanilla extract
-
1 tsp white vinegar
-
¾ cup all-purpose flour
-
¼ cup unsweetened cocoa powder
-
¼ tsp salt
Cream Cheese Swirl:
-
8 oz cream cheese, softened
-
¼ cup granulated sugar
-
1 egg yolk
-
½ tsp vanilla extract
Instructions
-
Preheat oven to 350°F (175°C). Line an 8×8-inch pan with parchment.
-
Melt butter and mix in sugar, eggs, vanilla, red coloring, and vinegar.
-
In a bowl, whisk flour, cocoa, and salt. Combine with wet mixture. Set aside ¼ cup batter.
-
Beat cream cheese, sugar, egg yolk, and vanilla until smooth.
-
Pour red velvet batter into pan. Spoon cream cheese on top. Drizzle reserved batter and swirl gently.
-
Bake 28–32 minutes. Cool completely, then chill 1 hour before slicing.
Notes
-
Add crushed Oreos or chocolate chips for variation.
-
Use gel food coloring for vibrant red.
-
Store in fridge for 5 days or freeze up to 2 months.