
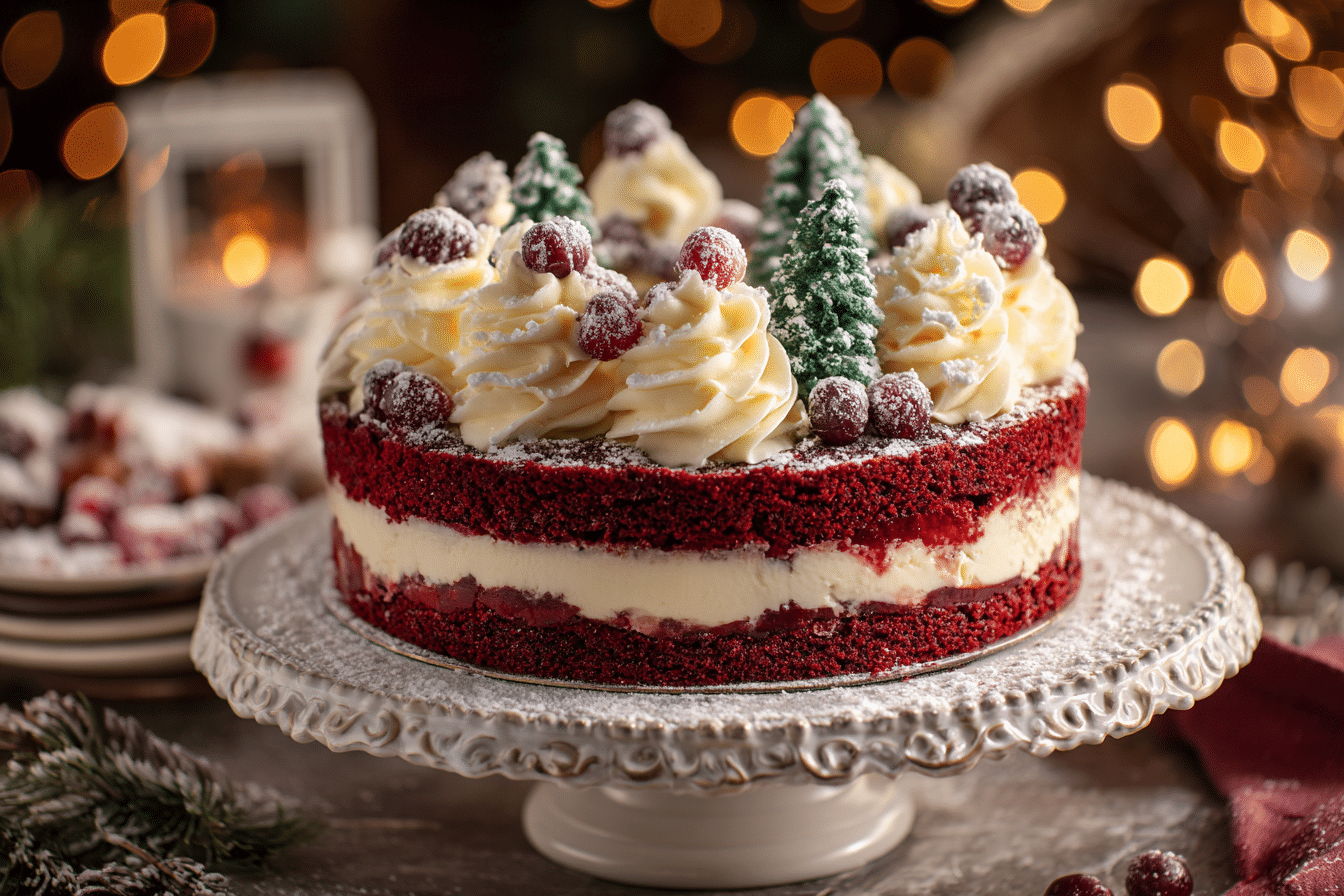
Christmas Red Velvet Cheesecake is the ultimate holiday dessert — elegant, festive, and decadently rich. This stunning cake blends two classic favorites: vibrant red velvet cake and creamy cheesecake, all wrapped into one unforgettable centerpiece. With its eye-catching layers, smooth vanilla undertones, and a hint of cocoa, it’s everything you love about the season in every bite.
Often served during Christmas and winter gatherings, this dessert stands out not just for its looks, but for its melt-in-your-mouth texture. The base is a moist red velvet cake, topped with a layer of silky cheesecake, and finished with whipped cream or cream cheese frosting. It’s the kind of dessert that brings gasps at the dinner table — and disappears quickly.
Ingredients Overview
This cheesecake is made with two distinct layers — red velvet cake and classic cheesecake — and topped with a holiday-worthy finish. Each ingredient plays a specific role in the structure and flavor of the final dessert.
Red Velvet Cake Layer
-
All-Purpose Flour: Forms the base of the cake, giving it structure.
-
Granulated Sugar: Sweetens the cake and helps with browning.
-
Cocoa Powder: Just a touch (1–2 teaspoons) gives red velvet its signature hint of chocolate.
-
Baking Soda & Vinegar: The classic combo that gives red velvet its light texture and tangy note.
-
Buttermilk: Adds moisture and tang, which enhances the cocoa flavor and reacts with the baking soda.
-
Vegetable Oil: Keeps the cake moist and tender.
-
Egg: Binds the ingredients and adds richness.
-
Red Gel Food Coloring: Gives the cake its iconic holiday hue without adding extra liquid.
-
Vanilla Extract: Balances the tang and enhances the chocolate.
Cheesecake Layer
-
Cream Cheese (Full-Fat): Use high-quality cream cheese for the smoothest texture. Bring it to room temperature before mixing.
-
Granulated Sugar: Sweetens the cheesecake without overpowering it.
-
Sour Cream: Adds a subtle tang and contributes to the velvety texture.
-
Vanilla Extract: Adds depth and warmth.
-
Eggs: Essential for structure — mix in gently to avoid air bubbles.
Optional Toppings
-
Whipped Cream or Cream Cheese Frosting: Adds holiday flair and balances the richness.
-
White Chocolate Shavings, Red Sprinkles, or Crushed Peppermint: For seasonal decoration.
-
Fresh Berries or Sugared Cranberries: Optional, but festive and fresh.
Substitutions & Notes:
-
Use Greek yogurt in place of sour cream if needed.
-
For a nutty twist, add a pecan or graham crust base.
-
Use natural food coloring or beet powder for a dye-free version.
Step-by-Step Instructions
Though this dessert has two layers, the steps are simple and methodical. Give yourself time to chill the cheesecake fully for the best texture.
Step 1: Preheat and Prepare
Preheat your oven to 325°F (163°C). Grease and line a 9-inch springform pan with parchment paper on the bottom and sides. Wrap the outside of the pan with foil to prevent water bath leakage.
Step 2: Make the Red Velvet Batter
In a bowl, whisk together:
-
1 cup all-purpose flour
-
¾ cup granulated sugar
-
1 tbsp cocoa powder
-
½ tsp baking soda
-
Pinch of salt
In another bowl, whisk:
-
½ cup buttermilk
-
⅓ cup vegetable oil
-
1 large egg
-
1 tsp white vinegar
-
1 tsp vanilla extract
-
1 tbsp red gel food coloring
Combine the wet and dry mixtures and whisk until smooth. Pour into the bottom of the pan and spread evenly.
Bake at 325°F for 18–20 minutes until set but not fully baked. Cool slightly while making the cheesecake.
Step 3: Make the Cheesecake Filling
In a large bowl, beat:
-
3 (8 oz) blocks cream cheese, softened
-
1 cup granulated sugar
Beat until smooth and fluffy — about 2–3 minutes.
Add:
-
¾ cup sour cream
-
1 tbsp vanilla extract
Mix until combined, scraping down sides.
Add:
-
3 large eggs, one at a time, mixing just until incorporated (do not overmix).
Pour the cheesecake batter gently over the slightly cooled red velvet layer.
Step 4: Bake in a Water Bath
Place the springform pan into a larger roasting pan. Pour hot water into the outer pan to come halfway up the sides.
Bake at 325°F for 55–65 minutes. The edges should be set, and the center should jiggle slightly.
Turn off the oven, crack the door, and let the cheesecake cool inside for 1 hour. Remove from oven and water bath, then chill in the fridge for at least 4 hours or overnight.
Step 5: Decorate and Serve
Once chilled, remove from the pan and top with whipped cream or cream cheese frosting. Garnish with festive toppings of your choice — like white chocolate curls or sugared cranberries.
Slice with a warm knife for clean cuts.
Tips, Variations & Substitutions
-
Avoid Cracks: Don’t overmix the eggs and always bake in a water bath.
-
Clean Cuts: Dip your knife in hot water and wipe between each slice.
-
Mini Cheesecakes: Use muffin tins and bake for 18–20 minutes for individual servings.
-
Gluten-Free Option: Use a gluten-free flour blend or swap the cake base with a crust made from gluten-free cookies.
-
Crust Option: If you prefer a crusted cheesecake, press crushed Oreos or graham crackers into the pan before adding red velvet batter.
Serving Ideas & Occasions
This cheesecake is a showstopper on any holiday dessert table. Its bold red color and creamy topping make it ideal for Christmas parties, winter birthdays, or festive family dinners.
-
Serve With: Hot coffee, spiced tea, or mulled wine.
-
Presentation Tip: Top with sugared rosemary sprigs and cranberries for a frosted winter look.
-
Occasions: Perfect for Christmas Eve, holiday brunch, or New Year’s gatherings.
Nutritional & Health Notes
While this dessert is rich, it can be enjoyed mindfully:
-
Cream Cheese: Provides protein and calcium, though also high in fat.
-
Red Velvet Layer: Offers a small cocoa boost and iron from eggs and flour.
-
Portion Control: Cut into 12–14 slices — a small piece still satisfies.
-
Lighter Version: Use reduced-fat cream cheese and cut sugar by 15–20%.
This cheesecake is indulgent but worth the celebration.
FAQs
Q1: Can I make this ahead of time?
Yes, and it’s even better! Make it up to 2 days ahead. Store covered in the fridge until ready to decorate and serve.
Q2: Can I freeze red velvet cheesecake?
Absolutely. Freeze slices or the whole cake (undecorated) for up to 1 month. Thaw overnight in the fridge.
Q3: Do I need a water bath?
It’s strongly recommended. It ensures gentle, even cooking and prevents cracks.
Q4: What if I don’t have buttermilk?
Use ½ cup milk + 1½ tsp lemon juice or vinegar. Let sit for 5 minutes before using.
Q5: Can I skip the food coloring?
Yes — you’ll still have a delicious cocoa base, just not the vibrant red color.
Q6: Can I use a boxed red velvet mix?
For speed, yes. Bake a thin layer (about 1¼ cups of batter) and let it cool before topping with cheesecake.
Q7: How do I store leftovers?
Wrap tightly and refrigerate for up to 5 days. For longer storage, freeze in airtight containers.
Christmas Red Velvet Cheesecake with Creamy Holiday Layers
A festive holiday dessert with layers of moist red velvet cake and creamy vanilla cheesecake, finished with whipped cream or holiday garnish.
- Prep Time: 30 minutes
- Cook Time: 65 minutes
- Total Time: 30 minutes
- Yield: 12–14 servings 1x
Ingredients
Red Velvet Layer:
-
1 cup all-purpose flour
-
¾ cup sugar
-
1 tbsp cocoa powder
-
½ tsp baking soda
-
Pinch salt
-
½ cup buttermilk
-
⅓ cup vegetable oil
-
1 egg
-
1 tsp vinegar
-
1 tsp vanilla extract
-
1 tbsp red gel food coloring
Cheesecake Layer:
-
24 oz cream cheese, softened
-
1 cup sugar
-
¾ cup sour cream
-
1 tbsp vanilla extract
-
3 large eggs
Topping (optional):
-
Whipped cream or cream cheese frosting
-
White chocolate curls, red sprinkles, sugared cranberries
Instructions
-
Preheat oven to 325°F. Line and foil-wrap a springform pan.
-
Mix red velvet ingredients, pour into pan, and bake for 18–20 mins.
-
Beat cream cheese and sugar until smooth. Add sour cream, vanilla, and eggs.
-
Pour over red velvet layer. Place pan in a water bath.
-
Bake for 55–65 minutes until set with slight jiggle.
-
Cool in oven for 1 hour, then chill 4+ hours or overnight.
-
Decorate with whipped topping and festive garnishes.
Notes
Use beet powder for natural coloring. Make ahead for stress-free serving. Freeze leftovers in slices for easy holiday treats.