
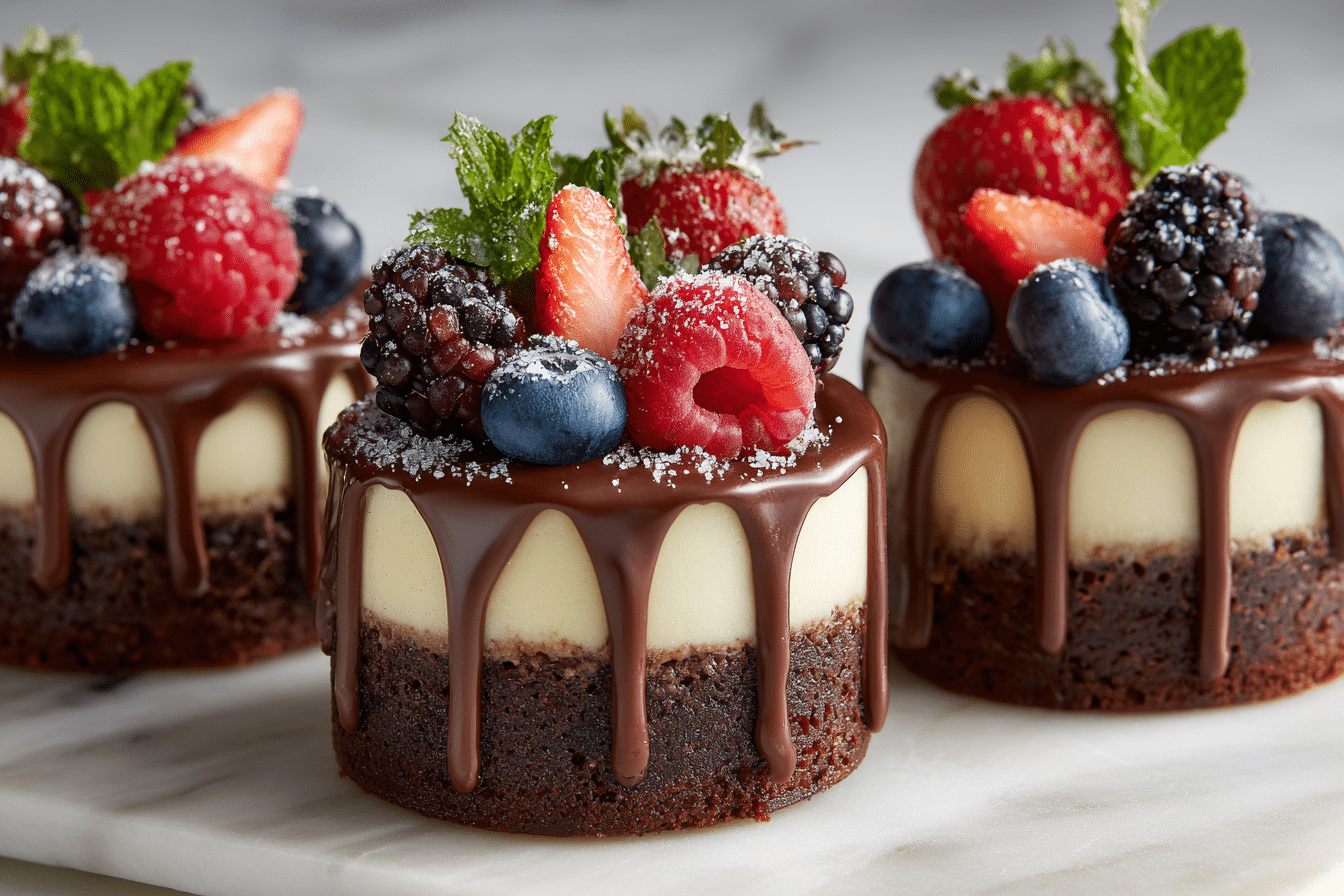
Loaded Brownie Cheesecake Dessert Cups are the kind of indulgent, over-the-top treat that turns heads at any gathering. Imagine this: a fudgy brownie base, a silky cheesecake middle, and a luscious chocolate ganache or whipped topping layer—all served in individual cups for the perfect personal-sized pleasure.
This no-bake (or low-bake) dessert is a dream for chocolate lovers and a practical make-ahead option for birthdays, holidays, or casual weekend cravings. Each spoonful delivers contrasting textures: chewy brownie, creamy cheesecake, and melt-in-your-mouth topping.
The beauty of these dessert cups lies not just in their flavor but also in their versatility. You can dress them up with crushed cookies, fruit, caramel drizzle, or even a shot of espresso for an adult twist. They’re rich, layered, and deeply satisfying—ideal for when you want something that feels both indulgent and effortless.
Ingredients Overview
These 3-layer dessert cups are built from a trio of distinct components, each customizable to suit your preferences or dietary needs.
Layer 1: Brownie Base
-
Homemade Brownies or Box Mix: Choose a dense, fudgy variety rather than cakey. Bake ahead, cool, and crumble or cut to size.
-
Store-Bought Brownie Bites: A shortcut that works well for ease and speed.
-
Gluten-Free Option: Use almond flour brownies or a gluten-free mix.
Flavor Tip: A pinch of espresso powder in the brownie layer deepens the chocolate flavor without making it taste like coffee.
Layer 2: Cheesecake Filling
-
Cream Cheese (full fat): The base of the cheesecake layer—smooth and tangy.
-
Powdered Sugar: For sweetness and smooth texture.
-
Heavy Whipping Cream: Whipped and folded in for lightness and mousse-like consistency.
-
Vanilla Extract: Enhances the cream cheese and brings warmth.
Optional additions:
-
Peanut Butter Swirl: For a nutty twist.
-
Oreo Crumbs or Cookie Butter: Fold into the cheesecake for added texture and flavor.
Layer 3: Chocolate Topping
-
Chocolate Ganache: Rich and glossy, made from chocolate and cream.
-
Whipped Cream or Chocolate Mousse: A lighter, fluffier finish.
-
Toppings: Crushed brownies, mini chocolate chips, sprinkles, nuts, caramel drizzle, or fresh berries.
Equipment Notes
-
Clear Cups or Jars: Use 6 to 8-ounce containers for ideal layering.
-
Piping Bags or Spoons: For clean and precise layers.
Step-by-Step Instructions
Follow this method to create perfectly layered dessert cups. This recipe makes 6–8 servings.
1. Prepare the Brownie Base
-
Bake brownies (from scratch or a box mix) and allow them to cool completely.
-
Cut into small cubes or crumble into large chunks, depending on your texture preference.
-
Add 2–3 pieces to the bottom of each dessert cup, pressing gently for a dense base.
Shortcut: Use store-bought brownie bites or leftover brownies. You can even brush with a little coffee or chocolate liqueur for extra richness.
2. Make the Cheesecake Layer
-
In a bowl, beat 225g (8 oz) cream cheese until smooth.
-
Add ⅓ cup powdered sugar and 1 tsp vanilla extract; mix until creamy.
-
In a separate bowl, whip ½ cup heavy cream to soft peaks.
-
Fold the whipped cream into the cream cheese mixture until fully combined.
-
Spoon or pipe a generous layer over the brownie base in each cup.
-
Smooth with a spoon or tap the cups to level the layer.
Optional: Swirl in peanut butter, cookie butter, or a layer of crushed cookies between the brownie and cheesecake for extra indulgence.
3. Prepare the Topping
Option 1: Ganache
-
Heat ½ cup heavy cream until steaming (not boiling).
-
Pour over 100g chopped dark or semi-sweet chocolate.
-
Let sit 1 minute, then stir until glossy.
-
Cool slightly, then spoon over cheesecake layer.
Option 2: Whipped Cream or Mousse
-
Pipe freshly whipped cream or prepared chocolate mousse over the cheesecake layer.
4. Finish with Toppings
-
Crumble brownie bits on top.
-
Add chocolate curls, crushed nuts, or a drizzle of caramel.
-
Top with mini marshmallows or fresh berries for contrast.
5. Chill and Serve
-
Refrigerate for at least 1 hour before serving to allow the layers to set.
-
Serve cold with a spoon for the full layered experience.
Tips, Variations & Substitutions
Pro Tips
-
Use clear cups or jars: Seeing the layers enhances presentation.
-
Make ahead: These cups can be made 1–2 days in advance and stored covered in the fridge.
-
Room temperature cream cheese: Prevents lumps and makes mixing easier.
Variations
-
Salted Caramel Version: Add a caramel swirl above the brownie layer and top with flaky sea salt.
-
Mint Chocolate: Add mint extract to the cheesecake layer and top with Andes mints.
-
Mocha: Mix 1 tsp espresso powder into the cheesecake layer and top with coffee whipped cream.
Dietary Substitutes
-
Gluten-Free: Use certified GF brownies and cookies.
-
Vegan: Use vegan cream cheese, plant-based whipped cream, and eggless brownie base.
-
Low-Sugar: Swap sugar with erythritol or monk fruit sweetener.
Serving Ideas & Occasions
These dessert cups are ideal for:
-
Birthday parties: Easy to serve, no slicing required.
-
Holiday gatherings: Festive enough for Thanksgiving or Christmas.
-
Date nights or dinner parties: Elegant enough to impress.
-
Meal prep: Store individually for a quick weeknight dessert.
Serve with a strong coffee, cold milk, or a shot of espresso for a decadent pairing.
For a fun dessert bar, lay out ingredients and let guests build their own layers!
Nutritional & Health Notes
These dessert cups are undeniably indulgent, but portioned servings help keep things balanced. Each cup provides a mix of:
-
Protein from cream cheese
-
Calcium from dairy
-
Antioxidants from dark chocolate and berries (if added)
To lighten:
-
Use low-fat cream cheese and reduced sugar.
-
Swap ganache for a yogurt-based topping or use Greek yogurt in the cheesecake layer.
Keep in mind, they’re meant to satisfy with a few rich bites—quality over quantity wins here.
FAQs
Q1: Can I make these cups ahead of time?
A1: Yes! They store well in the fridge for up to 3 days. Keep covered to maintain freshness and texture.
Q2: Can I freeze the dessert cups?
A2: You can freeze them, but the texture of the cheesecake and ganache may change slightly upon thawing. Freeze without toppings and thaw in the fridge.
Q3: What can I use instead of brownie for the base?
A3: Crushed chocolate cookies, chocolate cake, or even a layer of chocolate pudding can work. The goal is to provide a fudgy or crunchy base.
Q4: How do I transport these for parties?
A4: Use lids or plastic wrap and pack them in a box with sides to avoid tipping. Mason jars or lidded plastic cups work great for portability.
Q5: Can I make these without a mixer?
A5: Yes. Soften the cream cheese well and use a whisk or spatula. It’ll take more effort, but still works beautifully.
Q6: How do I make these less sweet?
A6: Reduce the sugar in the cheesecake layer and use unsweetened dark chocolate for the ganache. You can also skip extra toppings.
Q7: Can I add fruit to the layers?
A7: Absolutely! Fresh raspberries, sliced strawberries, or cherry compote pair well with all three layers. Add fruit between the brownie and cheesecake for best results.
Loaded Brownie Cheesecake Dessert Cups (Ultimate 3 Layer Treat)
Decadent 3-layer dessert cups with fudgy brownie, creamy cheesecake, and rich chocolate topping—perfectly portioned and packed with flavor.
- Prep Time: 25 minutes
- Cook Time: 20 minutes (for brownies)
- Total Time: 1 hour (including chill time)
- Yield: 6–8 cups 1x
Ingredients
-
Brownie Layer:
-
1 batch brownies (boxed or homemade), cooled and cubed
-
-
Cheesecake Layer:
-
8 oz (225g) cream cheese, softened
-
⅓ cup powdered sugar
-
1 tsp vanilla extract
-
½ cup heavy whipping cream
-
-
Chocolate Ganache Topping:
-
½ cup heavy cream
-
100g chopped dark or semi-sweet chocolate
-
-
Optional Toppings:
-
Brownie crumbs, mini chips, berries, nuts, caramel, whipped cream
-
Instructions
-
Layer crumbled or cubed brownies into 6–8 dessert cups.
-
Beat cream cheese, sugar, and vanilla until smooth.
-
Whip cream to soft peaks and fold into cream cheese mixture.
-
Spoon cheesecake layer over brownies and level the top.
-
Heat cream, pour over chocolate, let sit 1 min, stir into ganache.
-
Cool slightly and spoon over cheesecake layer.
-
Garnish and chill at least 1 hour before serving.
Notes
-
Use clear jars for visual impact.
-
Add flavor twists like mint, caramel, or peanut butter.
-
Store covered in fridge up to 3 days.