
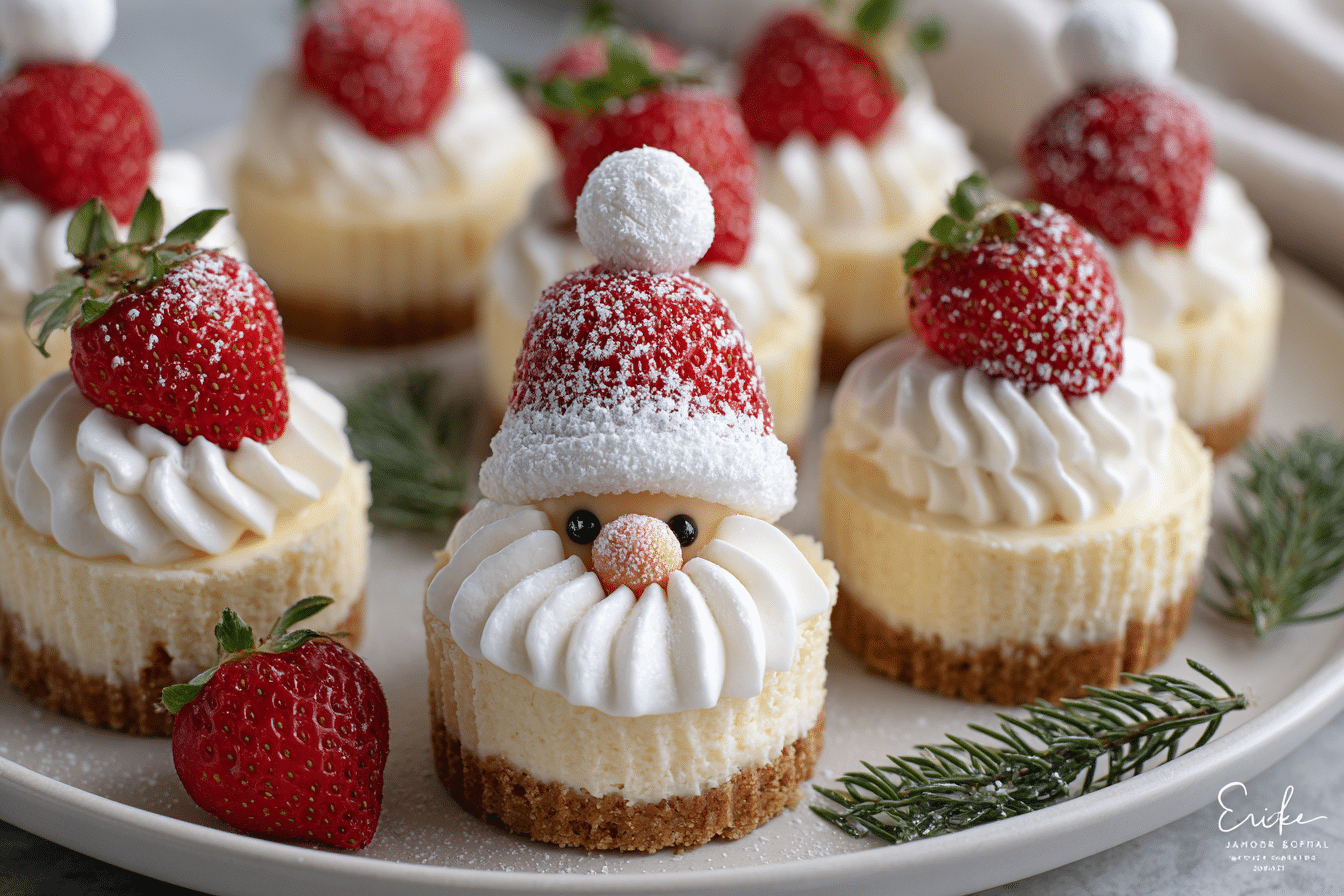
Gnome Mini Cheesecakes are the cutest no-bake Christmas dessert you’ll serve all season. With their jolly little “hats,” white chocolate beards, and rosy noses, these festive treats resemble Santa’s favorite helpers—gnomes! But underneath all the charm is a rich and creamy no-bake cheesecake layered over a buttery cookie crust.
Perfect for holiday parties, cookie exchanges, or kids’ Christmas activities, these mini cheesecakes are made in cupcake liners or silicone molds and require no oven time. The filling is smooth and fluffy, the crust is buttery and crisp, and the decorations turn each one into an edible holiday character.
These bite-sized desserts are just as fun to make as they are to eat—ideal for little hands, cozy kitchen days, and magical December moments.
Ingredients Overview
This recipe has three parts: a buttery base, a creamy cheesecake filling, and fun, edible gnome decorations. Each is made with easy-to-find ingredients and minimal equipment.
Crust Base
-
Graham Crackers or Digestive Biscuits: Crushed into fine crumbs for the base.
-
Butter (unsalted): Melted and mixed into crumbs to form a firm crust.
-
Sugar (optional): Just a touch to sweeten the base, if desired.
No-Bake Cheesecake Filling
-
Cream Cheese: Full-fat for the best texture and taste. Room temperature helps it blend smoothly.
-
Powdered Sugar: Sweetens the filling without grittiness.
-
Vanilla Extract: Adds cozy, classic flavor.
-
Heavy Whipping Cream: Whipped and folded in to make the filling light and mousse-like.
-
Lemon Juice (optional): Just a splash to brighten the flavor and balance sweetness.
Gnome Decorations
-
Strawberries: Fresh, stemmed, and cleaned. These become the gnome hats.
-
White Chocolate or Shredded Coconut: For beards—melted and piped or sprinkled.
-
Mini Marshmallows, M&Ms, or Candy Pearls: To create little noses.
-
Whipped Cream (optional): For a snowy effect or to secure toppings.
-
Candy Eyes (optional): If you want to give your gnome a face!
Equipment
-
Cupcake or muffin pan
-
Paper or silicone cupcake liners
-
Electric mixer or hand whisk
-
Piping bag or plastic bag (for decorating)
Step-by-Step Instructions
This recipe makes 10–12 mini cheesecakes. Allow at least 4 hours of chilling time before decorating.
1. Prepare the Crust
-
Crush 1¼ cups graham crackers or biscuits into fine crumbs.
-
Stir in 4 tablespoons melted butter and 1 tablespoon sugar (optional).
-
Line muffin tin with cupcake liners.
-
Press 1–2 tablespoons of crumb mixture into each liner. Use the back of a spoon or a tamper to flatten evenly.
-
Chill in the fridge while you make the filling.
2. Make the Cheesecake Filling
-
Beat 8 oz (225g) cream cheese until smooth.
-
Add ½ cup powdered sugar and 1 tsp vanilla extract. Beat again until creamy.
-
In a separate bowl, whip ¾ cup heavy cream until soft peaks form.
-
Fold whipped cream into the cream cheese mixture in batches until fully combined and fluffy.
-
Spoon or pipe the mixture onto the chilled crusts, filling each liner nearly to the top.
-
Smooth the tops and refrigerate at least 4 hours, or overnight for best results.
3. Decorate as Gnomes
Once the cheesecakes are fully chilled and set:
-
Add the Hat: Place one strawberry (pointed side up) on each cheesecake. You may need to cut a small flat base on the strawberry to sit evenly.
-
Make the Beard:
-
Melt white chocolate and pipe a “beard” around the base of the strawberry using a small round tip or ziplock bag with the corner snipped.
-
Or sprinkle shredded coconut in a beard shape.
-
-
Add the Nose: Press a mini marshmallow, round sprinkle, or candy into the cheesecake just under the strawberry “hat.”
-
Extra Details (Optional):
-
Add candy eyes peeking out from under the hat.
-
Pipe whipped cream around the base of the hat for a fuzzy trim effect.
-
4. Serve
-
Keep chilled until ready to serve.
-
Carefully peel off the wrapper just before eating.
Tips, Variations & Substitutions
Decorating Tips
-
Dry strawberries before placing: Excess moisture can cause sliding or weeping.
-
Use cold cheesecakes: Decorations stick better and hold their shape on a firm base.
-
Let kids decorate their own gnome: Make a holiday activity out of it!
Flavor Variations
-
Chocolate Base: Add 2 tablespoons cocoa powder to the crust for a chocolatey twist.
-
Peppermint Version: Add a drop of peppermint extract to the cheesecake filling.
-
Spiced Crust: Add cinnamon or nutmeg to the graham cracker crumbs.
Dietary Options
-
Gluten-Free: Use gluten-free graham crackers or oat cookies.
-
Vegan: Use plant-based cream cheese, dairy-free whipping cream, and vegan butter. Sub strawberries with halved vegan truffles for hats.
Serving Ideas & Occasions
These mini gnome cheesecakes are perfect for:
-
Christmas dessert tables
-
Winter-themed birthday parties
-
Holiday baking with kids
-
Gifting in festive treat boxes
Serve them with:
-
A mug of hot cocoa or eggnog
-
A plate of gingerbread cookies
-
A snowy dusting of powdered sugar for extra wintery flair
They’re especially charming on a rustic wood platter or Christmas-themed serving tray.
Nutritional & Health Notes
While these cheesecakes are festive treats, their individual portions help with mindful indulgence. Each mini cheesecake is rich and satisfying, thanks to the combination of cream cheese and whipped cream.
-
Strawberries add a fresh, slightly tart contrast to the sweet filling.
-
Graham cracker crusts provide simple carbs and crunch.
To lighten them:
-
Use low-fat cream cheese or Greek yogurt in place of full-fat.
-
Sweeten with maple syrup or stevia instead of powdered sugar.
Keep them chilled and enjoy them as a once-a-year seasonal delight.
FAQs
Q1: Can I make these ahead of time?
A1: Yes! You can make and chill the cheesecakes up to 2 days in advance. Decorate the tops the day you plan to serve for best appearance.
Q2: Can I freeze the mini cheesecakes?
A2: Yes, freeze without the decorations. Wrap tightly and store for up to 1 month. Thaw in the fridge overnight before adding strawberries and details.
Q3: What can I use instead of strawberries?
A3: Use mini ice cream cones, truffles, or red-frosted cookies as “hats.” Just make sure they’re lightweight and stable.
Q4: How do I keep the beards from melting?
A4: Decorate on fully chilled cheesecakes and use cooled (not hot) melted chocolate for piping.
Q5: Can I use whipped topping instead of whipping cream?
A5: Yes, you can fold in 1½ cups of thawed whipped topping like Cool Whip instead of whipped cream.
Q6: What’s the best way to store leftovers?
A6: Keep them in an airtight container in the fridge. They’ll stay fresh for up to 3 days.
Q7: Can I make these without cupcake liners?
A7: Yes, use silicone molds or mini tart pans for easy release. Lightly grease if using metal tins.
Gnome Mini Cheesecakes Everyone Loves at Christmas
Festive no-bake mini cheesecakes decorated like Christmas gnomes, featuring a graham cracker crust, creamy filling, and strawberry hats—perfect for holiday parties and kids’ decorating fun.
- Prep Time: 25 minutes
- Total Time: 4½ hours
- Yield: 10–12 mini cheesecakes 1x
Ingredients
-
Crust:
-
1¼ cups graham cracker crumbs
-
4 tbsp unsalted butter, melted
-
1 tbsp sugar (optional)
-
-
Filling:
-
8 oz (225g) cream cheese, softened
-
½ cup powdered sugar
-
1 tsp vanilla extract
-
¾ cup heavy whipping cream
-
1 tsp lemon juice (optional)
-
-
Toppings:
-
10–12 strawberries (hulled)
-
¼ cup melted white chocolate or shredded coconut
-
Mini marshmallows, M&Ms, or candy for noses
-
Optional: whipped cream, candy eyes, sprinkles
-
Instructions
-
Mix crust ingredients and press into lined cupcake tin. Chill.
-
Beat cream cheese, sugar, and vanilla until smooth.
-
Whip cream to soft peaks. Fold into cream cheese.
-
Pipe or spoon filling onto crusts. Smooth tops.
-
Chill at least 4 hours or overnight.
-
Decorate with strawberry hats, beards, and candy noses.
-
Keep chilled until ready to serve.
Notes
-
Decorate right before serving for best results.
-
Store covered in fridge for up to 3 days.
-
Use silicone molds for easy release without liners.