
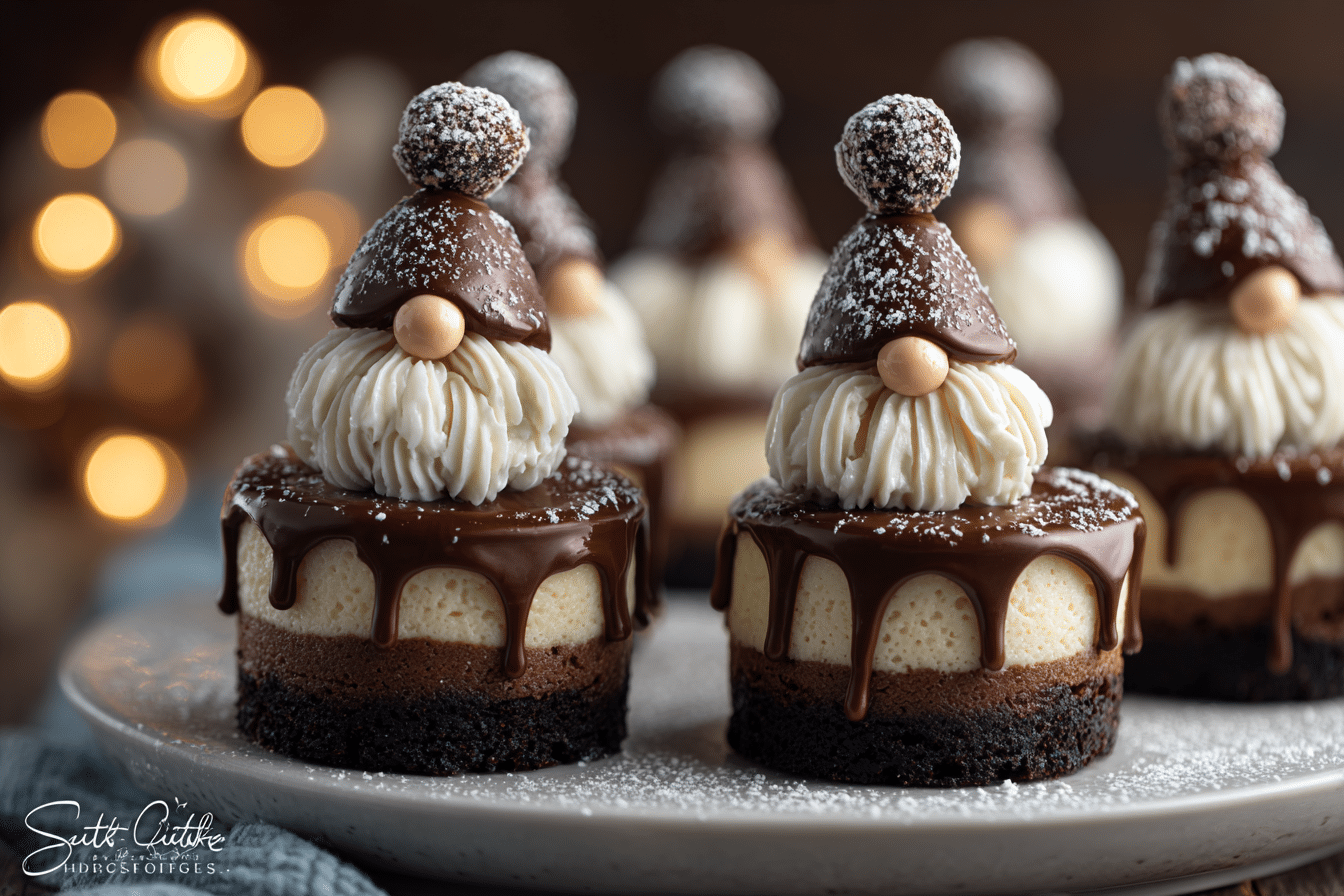
These Chocolate Gnome Cheesecakes are a magical holiday treat that blends rich, velvety chocolate cheesecake with whimsical gnome-inspired decorations. Mini-sized and full of festive flair, they’re perfect for Christmas dessert tables, edible gifts, or baking with kids during the holiday season.
Each cheesecake sits on a chocolate cookie crust and features a smooth, creamy chocolate filling baked in a muffin tin. The gnome decorations — complete with hats, beards, and candy noses — transform these indulgent mini cheesecakes into charming holiday characters.
Whether you’re a seasoned holiday baker or looking for something playful and impressive, these mini chocolate gnome cheesecakes are a delightful way to bring cheer to your kitchen and dessert platters.
Ingredients Overview
These cheesecakes are made with a classic baked cheesecake base, then decorated with simple holiday candies to create adorable gnome faces.
For the Chocolate Cookie Crust
Chocolate Sandwich Cookies (like Oreos)
Crushed cookies make a rich and crisp base. You can include the filling for added moisture or remove it for a firmer crust.
Unsalted Butter
Binds the cookie crumbs into a sturdy base for each mini cheesecake.
For the Chocolate Cheesecake Filling
Cream Cheese
Use full-fat, block-style cream cheese for best texture and richness. Make sure it’s at room temperature to avoid lumps.
Granulated Sugar
Sweetens the filling and balances the richness of the chocolate.
Cocoa Powder
Use unsweetened natural or Dutch-processed cocoa for a deep chocolate flavor.
Eggs
Bind the filling and help create a silky texture when baked. Bring to room temperature for smooth incorporation.
Sour Cream
Adds tanginess and a creamy consistency to the cheesecake.
Vanilla Extract
Boosts the chocolate flavor and adds balance.
For the Gnome Decorations
Strawberries or Sugar Cones
Act as gnome hats. Strawberries give a fresh, natural look, while dipped sugar cones add crunch and color.
White Chocolate or Buttercream
Used to pipe festive beards for each gnome.
Candy Balls, Mini Marshmallows, or Red Hots
Make the perfect gnome nose — nestled right under the brim of the hat.
Optional: Edible Glitter, Sprinkles, or Dust
Add a sparkly, snowy look to finish your gnomes.
Step-by-Step Instructions
1. Make the Crust
Ingredients:
-
18 chocolate sandwich cookies
-
4 tbsp unsalted butter, melted
Instructions:
-
Crush cookies into fine crumbs using a food processor or a bag and rolling pin.
-
Mix with melted butter until evenly coated.
-
Line a standard muffin tin with paper liners and press about 1½ tablespoons of crumb mixture into the bottom of each liner.
-
Chill while preparing the filling.
2. Make the Cheesecake Filling
Ingredients:
-
16 oz cream cheese, softened
-
½ cup granulated sugar
-
¼ cup unsweetened cocoa powder
-
2 large eggs
-
¼ cup sour cream
-
1 tsp vanilla extract
Instructions:
-
Preheat oven to 325°F (160°C).
-
In a mixing bowl, beat cream cheese until smooth and creamy.
-
Add sugar and cocoa powder, mixing until fully combined.
-
Add eggs one at a time, mixing on low speed.
-
Stir in sour cream and vanilla until just combined. Do not overmix.
-
Divide filling evenly among the crust-lined muffin cups, filling almost to the top.
3. Bake and Cool
-
Bake for 18–20 minutes, or until the centers are just set and the tops look matte.
-
Turn off the oven, crack the door slightly, and let cheesecakes rest inside for 5 minutes.
-
Remove from oven and cool at room temperature for 30 minutes.
-
Transfer to the fridge and chill for at least 2 hours, or overnight, before decorating.
4. Decorate the Gnome Cheesecakes
-
Remove liners and place chilled cheesecakes on a tray.
-
Pipe or spoon white chocolate or buttercream in a beard pattern starting from the top third of each cheesecake.
-
Press a strawberry (hulled side down) or dipped cone on top for the hat.
-
Add a candy “nose” just under the hat line and above the beard.
-
Optional: Dust with edible glitter or powdered sugar for a snowy look.
Tips, Variations & Substitutions
Decorating Tips
-
Chill cheesecakes fully before decorating — warm surfaces will melt frosting or chocolate.
-
Use a star tip to pipe beards for a textured look.
-
Apply a dab of frosting under the hat and nose to help secure them.
Flavor Variations
-
Peppermint Chocolate: Add ½ tsp peppermint extract to the filling and top with crushed candy canes.
-
Nutella Gnome Cheesecakes: Replace ¼ cup of the cream cheese with Nutella for a hazelnut twist.
-
Spiced Chocolate: Add a pinch of cinnamon and cayenne for Mexican chocolate flavor.
Substitutions
-
Gluten-Free: Use gluten-free chocolate cookies for the crust.
-
Dairy-Free: Use vegan cream cheese, sour cream, and dark chocolate.
-
No-Bake Option: Make a no-bake filling with whipped cream and softened cream cheese; chill instead of bake.
Serving Ideas & Occasions
These mini gnome cheesecakes are ideal for:
-
Christmas Dessert Tables: Stand out among cookies and pies.
-
Winter Birthdays: A whimsical treat for holiday-season birthdays.
-
Gifting: Package in clear cupcake boxes for a festive edible present.
-
Holiday Activities: Fun for decorating with kids or as a themed party project.
Serve them chilled with a cup of hot cocoa, mulled wine, or a scoop of peppermint ice cream.
Nutritional & Health Notes
While indulgent, these mini cheesecakes are built-in portion-controlled:
-
Smaller Servings: Each is rich enough to satisfy with a few bites.
-
Cream Cheese Base: A good source of calcium and fats — best enjoyed in moderation.
-
Decorations Are Customizable: You can skip the frosting or candy for a lighter version.
To lighten them up, use reduced-fat cream cheese and opt for fruit-only decorations like strawberries.
FAQs
Q1: Can I make these ahead of time?
A1: Yes! You can bake and chill the cheesecakes up to 2 days in advance. Decorate just before serving for best results.
Q2: Can I freeze mini cheesecakes?
A2: Absolutely. Freeze undecorated cheesecakes in an airtight container for up to 2 months. Thaw in the fridge overnight, then decorate.
Q3: What can I use instead of strawberries for hats?
A3: Try sugar cones dipped in red candy melts, upside-down chocolate kisses, or red-frosted mini cupcakes for a whimsical twist.
Q4: How do I prevent cheesecake from cracking?
A4: Don’t overmix the batter, and allow the cheesecakes to cool slowly. Mini cheesecakes are less prone to cracks than large ones.
Q5: Can I make them without a muffin tin?
A5: Yes, use mini cheesecake pans or silicone molds for a smooth-sided finish. Just ensure they hold their shape.
Q6: Do I need to water-bath mini cheesecakes?
A6: Not necessary for minis. They bake quickly and evenly in a regular oven.
Q7: How long will they last in the fridge?
A7: Store in an airtight container in the refrigerator for up to 5 days. Add fresh decorations just before serving.
Chocolate Gnome Cheesecakes – Festive Mini Christmas Dessert
Mini chocolate cheesecakes with a cookie crust, decorated as adorable holiday gnomes — a rich and festive Christmas dessert perfect for parties and gifting.
- Prep Time: 25 minutes
- Cook Time: 20 minutes
- Total Time: 2 hours 45 minutes
- Yield: 15–18 mini cheesecakes 1x
Ingredients
Crust:
-
18 chocolate sandwich cookies
-
4 tbsp melted butter
Filling:
-
16 oz cream cheese, softened
-
½ cup sugar
-
¼ cup cocoa powder
-
2 large eggs
-
¼ cup sour cream
-
1 tsp vanilla extract
Decorations:
-
15–18 strawberries or sugar cones
-
½ cup white chocolate or buttercream (for beards)
-
Mini marshmallows or candy balls (for noses)
-
Optional: powdered sugar or edible glitter
Instructions
-
Preheat oven to 325°F. Line muffin tin with paper liners.
-
Mix crushed cookies and melted butter. Press into liners. Chill.
-
Beat cream cheese until smooth. Add sugar, cocoa, eggs, sour cream, and vanilla.
-
Fill cups and bake 18–20 minutes. Cool fully, then chill 2 hours.
-
Decorate with beards, hats, and candy noses. Serve chilled.
Notes
Store up to 5 days in the fridge or freeze before decorating. Use piping tips for decorative beards and candy melts for colorful hats.