
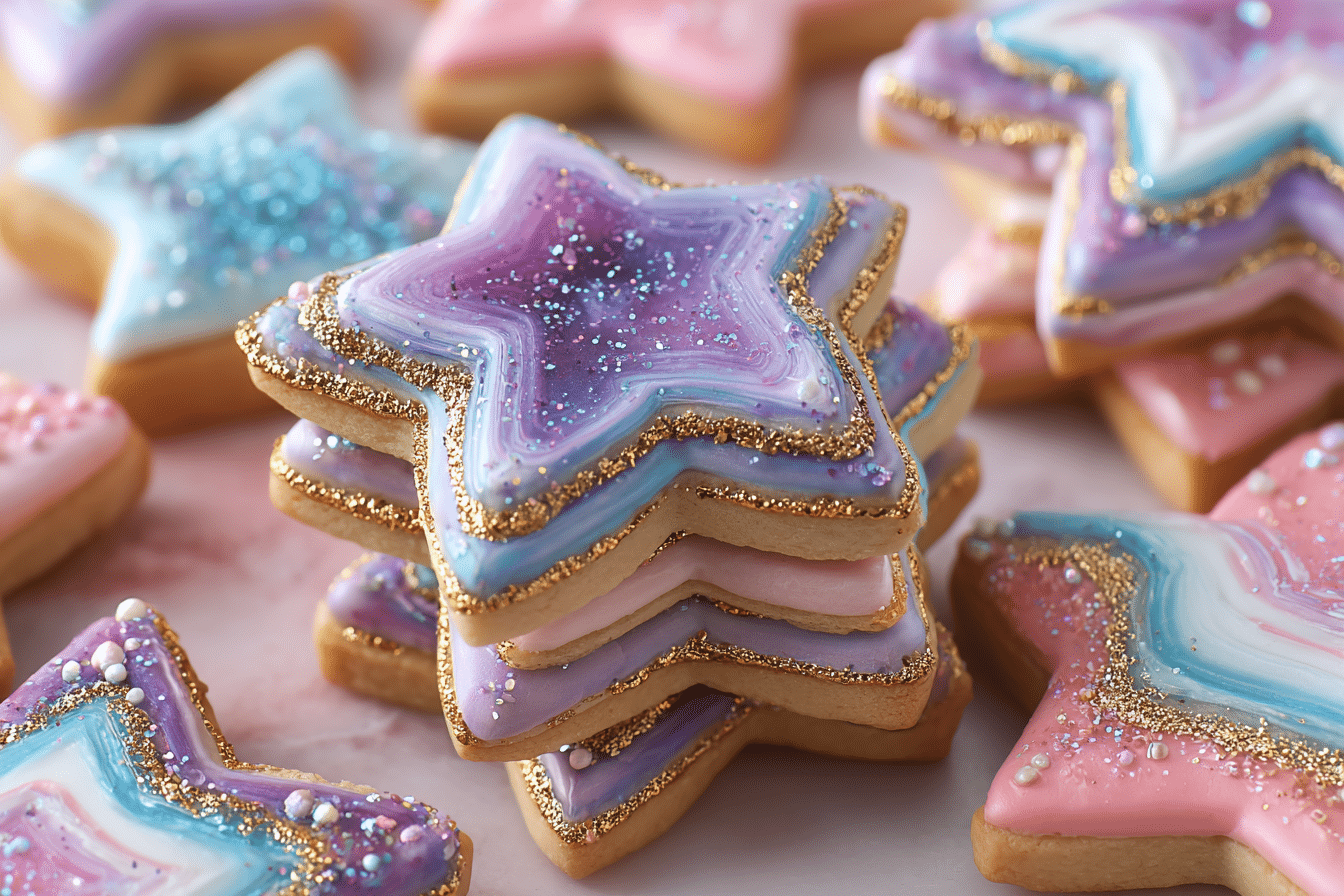
If you’re looking for a cookie that’s equal parts edible art and delicious dessert, geode cookies are your ultimate holiday showpiece. These stunning geode cookies sparkle and shine with jewel-toned sugar crystals nestled inside golden-edged cutouts, mimicking the natural beauty of gemstone geodes. They’re elegant, customizable, and guaranteed to impress at parties, weddings, or as edible gifts.
These cookies start with a buttery sugar cookie base that holds its shape beautifully. The centers are carved out and filled with crushed candy or sparkling rock sugar to form the shimmering “geode” interior. With just a bit of edible glitter and food coloring, you’ll create a dazzling effect that turns a simple treat into something magical.
Perfect for Christmas, New Year’s Eve, birthdays, or baby showers, geode cookies are proof that desserts can be both artistic and crave-worthy.
Ingredients Overview
All-Purpose Flour
The base of the cookie dough, providing structure and stability to hold the geode center without spreading too much.
Unsalted Butter
Room temperature butter adds rich flavor and creates a tender texture. Make sure it’s not too soft—just pliable enough to cream with sugar.
Granulated Sugar
Sweetens the dough and helps achieve a slight crunch around the edges. A light touch of sugar keeps the cookie from overpowering the geode filling.
Egg
Binds the dough and adds just enough moisture to keep the cookies tender yet sturdy.
Vanilla Extract
Adds subtle warmth and sweetness. You can also add almond extract for a delicate flavor upgrade.
Baking Powder & Salt
Help the dough rise slightly and balance the sweetness. Avoid using too much baking powder, as it may cause the cookie shape to puff.
Rock Sugar or Crushed Clear Candy
This is the “crystal” inside the geode. Clear rock sugar or crushed isomalt candy mimics real crystal beautifully and holds up during baking.
Gel Food Coloring
Used to tint the sugar crystals to look like amethyst, sapphire, rose quartz, or emerald. Gel coloring provides rich pigment without altering the sugar’s texture.
Edible Glitter or Luster Dust
Adds shimmer and gives the geode a stunning, realistic sparkle. Use gold or silver to paint the edges for a gilded finish.
Optional Additions
-
Almond or citrus zest for flavor in the dough
-
Edible gold leaf for an ultra-luxurious finish
-
Isomalt for a professional-style, glassy sugar crystal center
Step-by-Step Instructions
Step 1: Make the Sugar Cookie Dough
In a large bowl, beat 3/4 cup unsalted butter with 3/4 cup granulated sugar until light and creamy (about 2–3 minutes).
Beat in 1 egg and 1 1/2 teaspoons vanilla extract until fully combined.
In a separate bowl, whisk together 2 1/4 cups all-purpose flour, 1/2 teaspoon baking powder, and 1/4 teaspoon salt. Gradually add to the butter mixture and mix until a soft dough forms.
Divide the dough in half, flatten into disks, wrap in plastic, and chill for at least 1 hour.
Step 2: Prepare the Crystals
In small bowls, divide clear rock sugar or crushed hard candy into portions. Tint each with gel food coloring by adding a drop at a time and stirring until the desired shade is reached. Let dry slightly on parchment paper.
Step 3: Roll and Cut the Cookies
Preheat oven to 350°F (175°C). Line baking sheets with parchment paper.
On a floured surface, roll out one dough disk to 1/4-inch thickness. Use large round or gemstone-shaped cutters to cut out cookies.
Use a smaller cutter or sharp knife to cut a shape from the center of each cookie—this is where the geode filling will go.
Transfer cookies to baking sheets. Re-roll dough scraps as needed.
Step 4: Fill with Sugar Crystals
Fill the cutout center of each cookie with colored rock sugar, mounding it slightly in the center for a 3D effect. Mix different colors for natural gradient effects or use ombre layers.
Step 5: Bake
Bake for 10–12 minutes, until the edges are lightly golden and the sugar centers have melted and fused. Cool completely on the baking sheet so the sugar sets and hardens.
Step 6: Add the Sparkle
Once cool, use a food-safe paintbrush to dust the sugar crystals with edible glitter or luster dust.
Brush gold or silver luster dust mixed with a few drops of lemon extract or vodka around the cookie edges or along the crystal seam for a metallic finish.
Common Mistakes to Avoid
-
Don’t overfill the centers—sugar can bubble over the edge.
-
Let the cookies cool completely before moving to avoid cracking the sugar.
-
Use gel food coloring, not liquid, to prevent the sugar from dissolving.
Tips, Variations & Substitutions
Tips for Success
-
Chill the dough to prevent spreading during baking.
-
Use cookie cutters with strong, geometric shapes for a polished look.
-
Layer different shades of the same color for a realistic geode gradient.
Creative Variations
-
Make heart-shaped geode cookies for Valentine’s Day.
-
Use blue tones and snowflake cutters for a frozen winter theme.
-
Personalize colors for weddings, baby showers, or birthdays.
Flavor Substitutions
-
Add lemon zest or almond extract to the dough for a twist.
-
Use gingersnap dough or chocolate sugar cookie dough for a darker contrast to the crystals.
-
Try coconut extract with pale pink or blue crystals for a dreamy pastel effect.
Serving Ideas & Occasions
These sparkling geode cookies are perfect for:
-
Holiday dessert platters
-
Christmas or New Year’s Eve parties
-
Bridal showers or engagement parties
-
Edible gifts packaged in clear treat bags
-
Cookie decorating parties with friends or kids
Serve them with a hot cup of tea, mulled cider, or a sparkling cocktail for an elegant pairing. You can even display them standing upright in dessert boxes or on cupcake stands for maximum visual impact.
They also make fantastic favors or edible name cards—just write on the back with edible ink or attach a personalized tag.
Nutritional & Health Notes
Each geode cookie contains about 160–200 calories, depending on size and sugar crystal volume. They’re rich in butter and sugar—meant to be a treat, not an everyday snack.
Using smaller cookie cutters and modest sugar crystal portions can reduce the calorie count. While the center is pure sugar, the overall portion is still manageable, especially when shared on a holiday cookie tray.
The dough itself contains simple, pantry-friendly ingredients without preservatives, and the decorating options are endlessly customizable to fit dietary needs and creative themes.
FAQs
1. Can I use isomalt instead of sugar crystals?
Yes! Isomalt melts more clearly and holds its shine better. It’s ideal if you want a more professional glass-like finish, but it requires careful handling.
2. How do I keep the sugar from bubbling over?
Fill just below the surface of the dough cutout and avoid over-packing. Bake on parchment to catch any spillover easily.
3. Do the sugar centers stay hard?
Yes, once cooled, they harden like candy. Store at room temperature to maintain the texture.
4. Can I freeze geode cookies?
You can freeze the undecorated cookies, but it’s best to add the sugar crystals after thawing. Frozen sugar centers can become tacky or cloudy when thawed.
5. Can I make them gluten-free?
Yes, use a 1:1 gluten-free baking flour blend. Chill the dough well before cutting to prevent crumbling.
6. How far in advance can I make these?
They stay fresh for up to 5 days in an airtight container. Make them a day or two ahead for best appearance and texture.
7. Can kids help decorate them?
Absolutely! Kids love helping sprinkle colored sugar, and it’s a fun hands-on holiday activity. Just be cautious with hot sugar right after baking.
Crystal Sugar Cookies That Look Like Real Geodes

Beautiful and buttery geode cookies with sparkling sugar crystal centers, decorated to resemble colorful gemstones. Perfect for Christmas, weddings, or edible gifts.
- Prep Time: 30 minutes
- Cook Time: 12 minutes
- Total Time: 1 hour 45 minutes
- Yield: 24 cookies 1x
Ingredients
2 1/4 cups all-purpose flour
1/2 tsp baking powder
1/4 tsp salt
3/4 cup unsalted butter, softened
3/4 cup granulated sugar
1 egg
1 1/2 tsp vanilla extract
1 cup clear rock sugar or crushed hard candy
Gel food coloring (various colors)
Edible glitter or luster dust (optional
Instructions
-
Beat butter and sugar until light and creamy.
-
Add egg and vanilla; mix well.
-
Whisk together flour, baking powder, and salt. Gradually add to wet mixture.
-
Divide dough, shape into disks, wrap, and chill 1 hour.
-
Tint sugar crystals with gel coloring. Let dry.
-
Roll dough to 1/4-inch thickness. Cut shapes and smaller centers.
-
Place cookies on parchment-lined baking sheets. Fill centers with sugar crystals.
-
Bake at 350°F for 10–12 mins until edges are golden.
-
Cool completely. Brush with luster dust or glitter as desired.
Notes
Use gel food coloring for vibrant crystals. Don’t overfill centers. Store at room temp for up to 5 days.