
No-bake brownies are the ultimate quick fix for your chocolate cravings—rich, fudgy, and deeply satisfying without ever turning on the oven. These brownies are made from wholesome, pantry-friendly ingredients and come together in minutes. They’re perfect for when you’re short on time, avoiding the oven, or just want a treat that feels indulgent and nourishing at the same time.
These brownies pack all the decadence of traditional baked versions, but with a chewy, dense texture that comes from naturally sticky ingredients like dates or nut butter. Their raw, unprocessed nature gives them an intense chocolate flavor that feels more direct and bold. You’ll get a deep cocoa hit, a hint of salt, and just enough sweetness to balance it all out.
Whether you’re making them for yourself, prepping a quick snack, or sharing with friends, these no-bake brownies are always a win. They’re also easy to customize for dietary needs, making them naturally vegan, gluten-free, and refined sugar-free with the right ingredients.
Ingredients Overview
The simplicity of no-bake brownies is part of their charm. Here’s a closer look at what goes into them and why each element matters:
Medjool Dates: These sticky, naturally sweet fruits are the base of many no-bake desserts. They bind the mixture and add rich caramel-like sweetness. If your dates are firm or dry, soak them in warm water for 10 minutes before using.
Unsweetened Cocoa Powder: The star of the show. Choose a high-quality, dark cocoa powder for the boldest chocolate flavor. It’s unsweetened, so the dates do the heavy lifting for sweetness.
Nuts (Walnuts, Almonds, or Pecans): Ground nuts add structure and texture. Walnuts are a popular choice because their oiliness pairs well with cocoa, but almonds or pecans also work beautifully. Toasting the nuts lightly before processing adds a deeper flavor.
Nut Butter (Optional): For added richness and softness. Almond butter, peanut butter, or cashew butter can be mixed in to make the brownies smoother and a little creamier.
Sea Salt: Just a pinch enhances the chocolate and makes the sweetness pop. It’s the secret behind flavor depth.
Vanilla Extract (Optional): Adds warmth and a bit of complexity without overpowering the chocolate.
Chocolate Chips or Chunks (Optional): For extra texture and gooey bits throughout, fold in some mini chips or chopped dark chocolate.
These ingredients can be modified easily to suit dietary needs. To make the recipe nut-free, replace nuts with sunflower seeds or rolled oats. For extra protein, you can add a scoop of chocolate or vanilla protein powder.
Step-by-Step Instructions
Step 1: Prepare the Dates
Pit your Medjool dates and check for firmness. If they’re dry, soak them in warm water for 10 minutes, then drain well. You’ll need about 1 1/2 cups of packed dates (about 12–14 large dates).
Step 2: Process the Nuts
In a food processor, pulse your choice of nuts (1 cup) until finely ground but not pasty. You want a coarse, flour-like texture with tiny visible pieces for structure.
Step 3: Add the Cocoa and Salt
Add 1/2 cup unsweetened cocoa powder and a pinch of sea salt to the ground nuts. Pulse a few times to combine evenly.
Step 4: Add Dates and Blend
Add the soaked and drained dates to the food processor. Blend until the mixture clumps together into a thick dough. Scrape down the sides as needed. It should be dense and sticky, holding its shape when pressed.
Step 5: Mix in Extras
If using, add 1–2 tablespoons of nut butter and 1/4 cup chocolate chips or chunks. Pulse briefly to incorporate. You can also stir in these extras by hand.
Step 6: Press into Pan
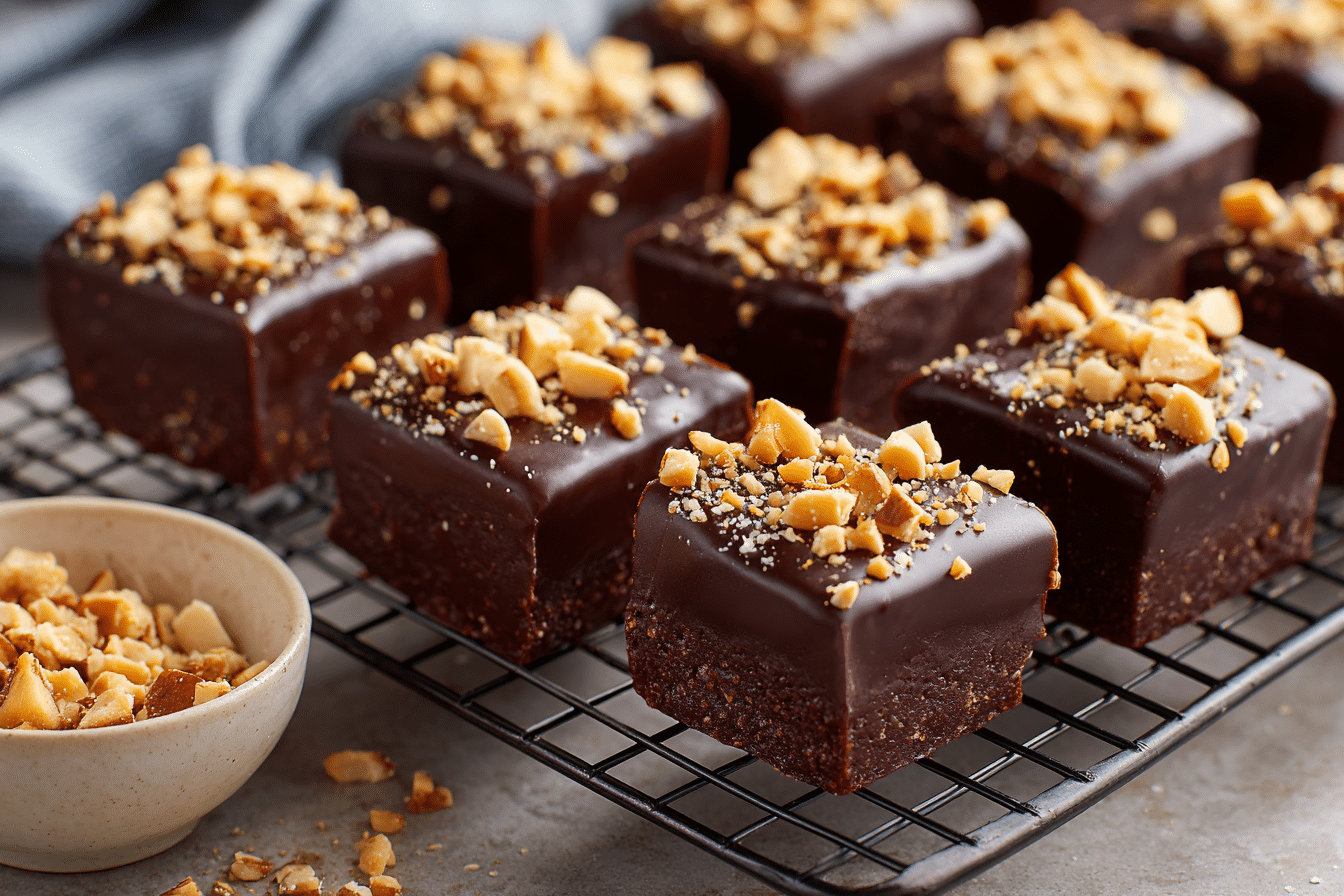
Line a small loaf pan or 8×8 dish with parchment paper. Transfer the dough and press it firmly into the pan with your hands or a spatula. Compacting the mixture is key to a good texture.
Step 7: Chill
Refrigerate for at least 1 hour to firm up. For quicker setting, freeze for 20–30 minutes. Once set, lift the parchment to remove, and slice into squares or bars.
Step 8: Serve or Store
Serve straight from the fridge for best texture. Store in an airtight container in the fridge for up to a week, or freeze for up to 3 months.
Tips, Variations & Substitutions
Tips:
-
Use soft, sticky dates—hard ones won’t bind the mixture well.
-
Don’t overprocess the nuts into butter.
-
Press the dough firmly to avoid crumbly brownies.
-
A sprinkle of flaky salt on top adds visual and flavor appeal.
Variations:
-
Coconut Dream: Add 1/4 cup shredded coconut to the mix.
-
Mocha Kick: Add 1 teaspoon espresso powder for depth.
-
Mint Brownies: A drop of peppermint extract gives a cool twist.
-
Protein Boost: Add a scoop of plant-based protein powder.
Substitutions:
-
Nut-Free: Use sunflower seeds, pumpkin seeds, or rolled oats.
-
Cocoa Alternatives: Raw cacao powder can be used in place of cocoa.
-
Sweetener Swap: Replace dates with dried figs or prunes, adjusting quantity to taste.
Serving Ideas & Occasions
These brownies are perfect as:
-
A healthy lunchbox treat
-
An afternoon pick-me-up with coffee or tea
-
A post-workout snack if boosted with protein
-
A guilt-free dessert after dinner
They also work great as part of a dessert board or in a holiday cookie tin for friends and family who prefer gluten-free or plant-based options. Dress them up with a drizzle of melted chocolate or a dusting of cocoa powder for a fancier finish.
Cut into small squares for energy bites or larger bars for full-on dessert mode.
Nutritional & Health Notes
No-bake brownies are naturally gluten-free, dairy-free, and often refined sugar-free. They’re rich in fiber, healthy fats, and antioxidants, especially when made with walnuts and dark cocoa.
Medjool dates provide natural sugars and potassium, while nuts contribute protein and omega-3s. Adding nut butter boosts satiety, making these brownies satisfying and nutrient-dense.
Although calorie-dense due to the nuts and dates, they’re more balanced than traditional brownies. Just one or two squares can curb sweet cravings with clean, whole ingredients.
For an even healthier twist, reduce the portion size or add a handful of seeds to up the nutrition.
FAQs
1. Do no-bake brownies taste like baked brownies?
They’re different in texture—more dense and chewy than cakey—but offer the same rich chocolate flavor. Many people find the raw version even more intense and satisfying.
2. Can I make them without a food processor?
A blender can work if it’s strong, but a food processor is ideal. For manual preparation, chop everything very finely and mix by hand, though the texture will be rougher.
3. Are they freezer-friendly?
Absolutely. Slice and wrap individual portions, then freeze. Let thaw in the fridge or at room temperature for 15–20 minutes before eating.
4. Can I add toppings?
Yes! Drizzle with melted dark chocolate, sprinkle sea salt, chopped nuts, or shredded coconut on top before chilling for added texture and flair.
5. How long do they last?
Stored in the fridge, they last up to a week. In the freezer, up to 3 months. Keep them airtight to prevent drying out.
6. Are they suitable for kids?
Definitely. They’re naturally sweet and full of whole ingredients. Great for lunchboxes or after-school snacks—just avoid nuts if allergies are a concern.
7. Can I reduce the sweetness?
Yes. Use fewer dates or combine with unsweetened add-ins like cacao nibs or protein powder. Keep in mind that dates provide the binding, so don’t reduce too much.
Chocolate No-Bake Brownies – Easy & Guilt-Free
These no-bake brownies are rich, chewy, and packed with bold cocoa flavor. Made with dates, nuts, and cocoa powder, they’re a quick, healthy treat that comes together without turning on the oven.
- Prep Time: 15 minutes
- Cook Time: 0 minutes
- Total Time: 15 minutes
- Yield: 12 squares 1x
Ingredients
1 1/2 cups Medjool dates, pitted
1 cup walnuts or almonds
1/2 cup unsweetened cocoa powder
Pinch of sea salt
1 teaspoon vanilla extract (optional)
2 tablespoons nut butter (optional)
1/4 cup chocolate chips or chunks (optional)
Instructions
-
If dates are firm, soak in warm water for 10 minutes. Drain well.
-
Pulse nuts in a food processor until finely ground.
-
Add cocoa powder and salt; pulse to combine.
-
Add dates and vanilla, process until mixture forms a sticky dough.
-
Mix in nut butter and chocolate chips, if using.
-
Press into a parchment-lined loaf pan or 8×8 dish.
-
Chill for 1 hour in the fridge or 30 minutes in the freezer.
-
Slice into bars or squares and serve.
Notes
Store in fridge up to 1 week or freeze up to 3 months. Use sunflower seeds or oats for nut-free version.