
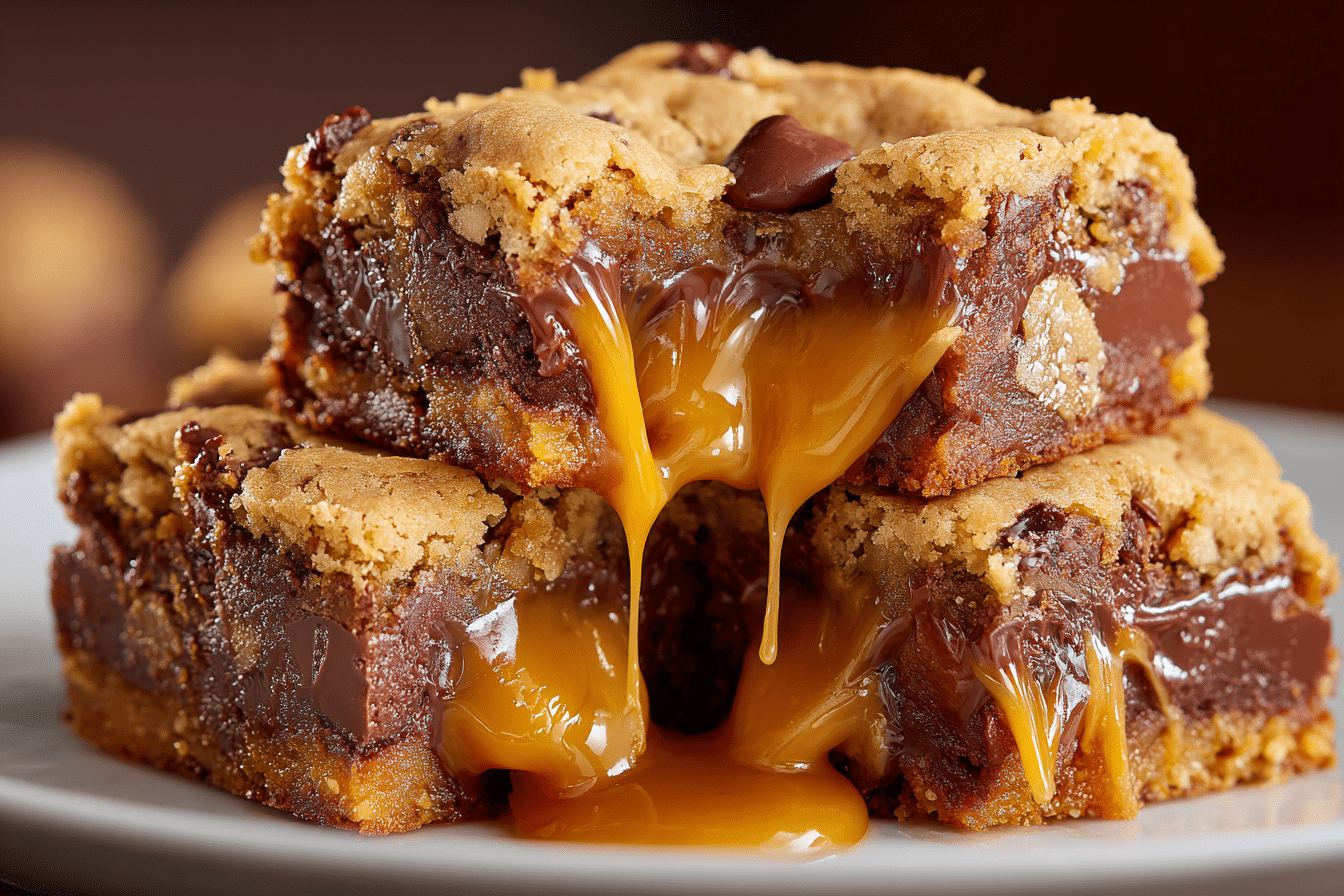
Knock You Naked Bars are a gooey, rich dessert bar layered with chocolate chips, buttery caramel, and chewy cookie dough. They’re messy in the best way—soft, sticky, and completely addictive. With their combination of melt-in-your-mouth texture and bold flavor, these bars live up to their cheeky name and always leave people asking for the recipe.
Whether you’re making them for a bake sale, potluck, or just to spoil yourself with a serious treat, these dessert bars deliver a perfect bite every time. The key is in the layering—starting with a golden brown cookie base, filled with thick caramel and chocolate, and finished with more cookie dough baked to golden perfection.
If you love chocolate chip cookies, caramel sauce, and soft cookie bars, this recipe is about to become a favorite in your kitchen.
Ingredients Overview
These bars are made with pantry staples, but each ingredient adds a key element to the gooey, chewy, caramel-filled layers.
Butter:
Melted unsalted butter is the base for the cookie dough. It brings richness and that slightly crispy edge when baked.
Brown Sugar:
Gives a deep, molasses flavor and contributes to the chewy texture. Light brown sugar is perfect, but dark works too for a richer taste.
Granulated Sugar:
Balances sweetness and gives structure to the dough.
Eggs:
Bind the dough and provide moisture. Room temperature eggs blend better for a smoother consistency.
Vanilla Extract:
Adds warmth and depth of flavor to the cookie base.
All-Purpose Flour:
Gives structure to the dough. Make sure to measure accurately to avoid a dense result.
Baking Soda and Salt:
Baking soda helps the dough rise slightly while salt enhances all the other flavors.
Chocolate Chips:
Semi-sweet chocolate chips melt into the caramel layer and also add richness to the cookie dough. Chopped chocolate chunks work, too.
Caramels:
Use individually wrapped soft caramels (like Kraft) for the filling. They melt into a thick, gooey layer when combined with cream or milk.
Evaporated Milk or Heavy Cream:
Helps melt the caramels into a pourable, creamy filling. Heavy cream makes it even richer.
Step-by-Step Instructions
-
Preheat Oven and Prepare Pan:
Preheat your oven to 350°F (175°C). Line a 9×13-inch baking dish with parchment paper, leaving a bit of overhang for easy removal. -
Make the Cookie Dough Base:
In a large bowl, whisk together 1 cup melted unsalted butter, 1 cup packed brown sugar, and ½ cup granulated sugar until smooth.
Beat in 2 large eggs and 2 teaspoons vanilla extract.
In a separate bowl, combine 2½ cups all-purpose flour, 1 teaspoon baking soda, and ½ teaspoon salt. Add dry ingredients to wet and stir until combined.
Fold in 1½ cups semi-sweet chocolate chips. -
Create the Caramel Filling:
In a saucepan over low heat, melt 1 (14 oz) bag of soft caramels with ⅓ cup evaporated milk or heavy cream. Stir constantly until smooth and creamy. Remove from heat and let cool slightly. -
Layer the Bars:
Press two-thirds of the cookie dough into the bottom of the prepared pan. Bake for 10 minutes.
Remove from oven and immediately pour the warm caramel mixture evenly over the baked cookie base.
Sprinkle another ½ cup chocolate chips over the caramel. -
Top with Remaining Dough:
Take the remaining cookie dough and flatten small pieces between your hands. Lay them gently over the caramel layer like a patchwork. It won’t completely cover the caramel, and that’s okay. -
Bake Again:
Return to the oven and bake for 20–25 more minutes, until the top is golden and the edges are set. The center will still look slightly gooey—don’t overbake. -
Cool and Chill:
Let the bars cool completely at room temperature, then refrigerate for at least 2 hours to help them firm up before slicing. This step is key for clean cuts. -
Slice and Serve:
Use the parchment overhang to lift the bars out of the pan. Cut into squares and serve slightly chilled or at room temperature.
Tips, Variations & Substitutions
Don’t skip the chilling. It’s tempting to cut them warm, but you’ll end up with a gooey mess. Chilling allows the caramel to set.
Use chopped pecans for a turtle version. Sprinkle them on top of the caramel before adding the final dough layer.
Make it salted caramel by sprinkling flaky sea salt over the caramel layer before baking.
Add peanut butter chips or butterscotch chips for a flavor twist.
Use dark chocolate for a more intense, less sweet version.
Turn them into cookie sandwiches. Freeze slightly, then sandwich with vanilla ice cream for an over-the-top dessert.
Serving Ideas & Occasions
Knock You Naked Bars are ideal for casual entertaining, potlucks, bake sales, or any time you want to bring the wow factor to dessert. Serve them on a platter at room temp or slightly chilled to highlight the layered texture.
They also make excellent gifts—stacked in parchment and tied with twine for a rustic, homemade feel. For a plated dessert, serve warm with a scoop of vanilla ice cream and a drizzle of extra caramel sauce.
These bars hold their shape well once chilled, making them easy to pack and transport. They’ll quickly become your go-to crowd-pleaser for any event.
Nutritional & Health Notes
These bars are definitely indulgent, with a combination of sugar, butter, and chocolate. Each square is rich, so small portions are satisfying.
For a slightly lighter version, you can reduce the sugar by ¼ cup or use dark chocolate chips instead of semi-sweet. Choose a caramel sauce made with natural ingredients if you want to avoid processed caramels.
They contain gluten, dairy, and eggs—so not suitable for those with allergies unless adapted using alternative ingredients.
As with any rich dessert, these bars are meant to be enjoyed as a treat. Their layered texture and bold flavors make every bite worth savoring.
FAQs
1. Why are they called “Knock You Naked” Bars?
The name is just a playful way to describe how irresistible they are. Don’t worry—they won’t literally knock you naked, but they might knock your socks off with flavor.
2. Can I make these ahead of time?
Yes! They’re even better the next day. Store them in the fridge for up to 5 days, or freeze for up to 2 months. Thaw in the fridge or at room temperature.
3. Can I use caramel sauce instead of melting caramels?
Yes, but it should be a thick, high-quality caramel that sets when cooled. Runny sauces will make the bars too soft and messy.
4. How do I cut them cleanly?
Chill the bars thoroughly before cutting. Use a sharp knife, and wipe it clean between each cut for the best results.
5. What if I don’t have evaporated milk?
You can substitute heavy cream or half-and-half. Whole milk also works but results in a slightly thinner caramel layer.
6. Are these freezer-friendly?
Definitely. Wrap individual bars in plastic wrap, then store in a freezer-safe container or bag. Thaw at room temperature before serving.
7. Can I make these gluten-free?
Yes. Use a 1:1 gluten-free baking flour blend and make sure your caramels and chocolate chips are certified gluten-free.
Chewy Cookie Bars with Caramel & Chocolate
Ultra-rich layered bars with chewy cookie dough, melted caramel, and chocolate chips—gooey, sweet, and totally irresistible.
- Prep Time: 20 minutes
- Cook Time: 35 minutes
- Total Time: 2 hours 55 minutes (includes chilling)
- Yield: 24 bars 1x
Ingredients
1 cup unsalted butter, melted
1 cup brown sugar, packed
½ cup granulated sugar
2 large eggs
2 tsp vanilla extract
2½ cups all-purpose flour
1 tsp baking soda
½ tsp salt
2 cups semi-sweet chocolate chips, divided
1 (14 oz) bag soft caramels, unwrapped
⅓ cup evaporated milk or heavy cream
Instructions
-
Preheat oven to 350°F (175°C). Line a 9×13 pan with parchment.
-
Mix melted butter, sugars, eggs, and vanilla until smooth.
-
Add flour, baking soda, and salt. Stir to combine.
-
Fold in 1½ cups chocolate chips.
-
Press two-thirds of the dough into the pan. Bake for 10 minutes.
-
Meanwhile, melt caramels with milk in a saucepan, stirring until smooth.
-
Pour caramel over baked base. Sprinkle remaining ½ cup chocolate chips.
-
Flatten pieces of remaining dough and layer on top.
-
Bake another 20–25 minutes until golden.
-
Cool completely, then chill for 2 hours. Cut into bars.
Notes
Chilling is key for clean slices.
Use sea salt or pecans for variation.
Store in fridge up to 5 days or freeze for 2 months.