
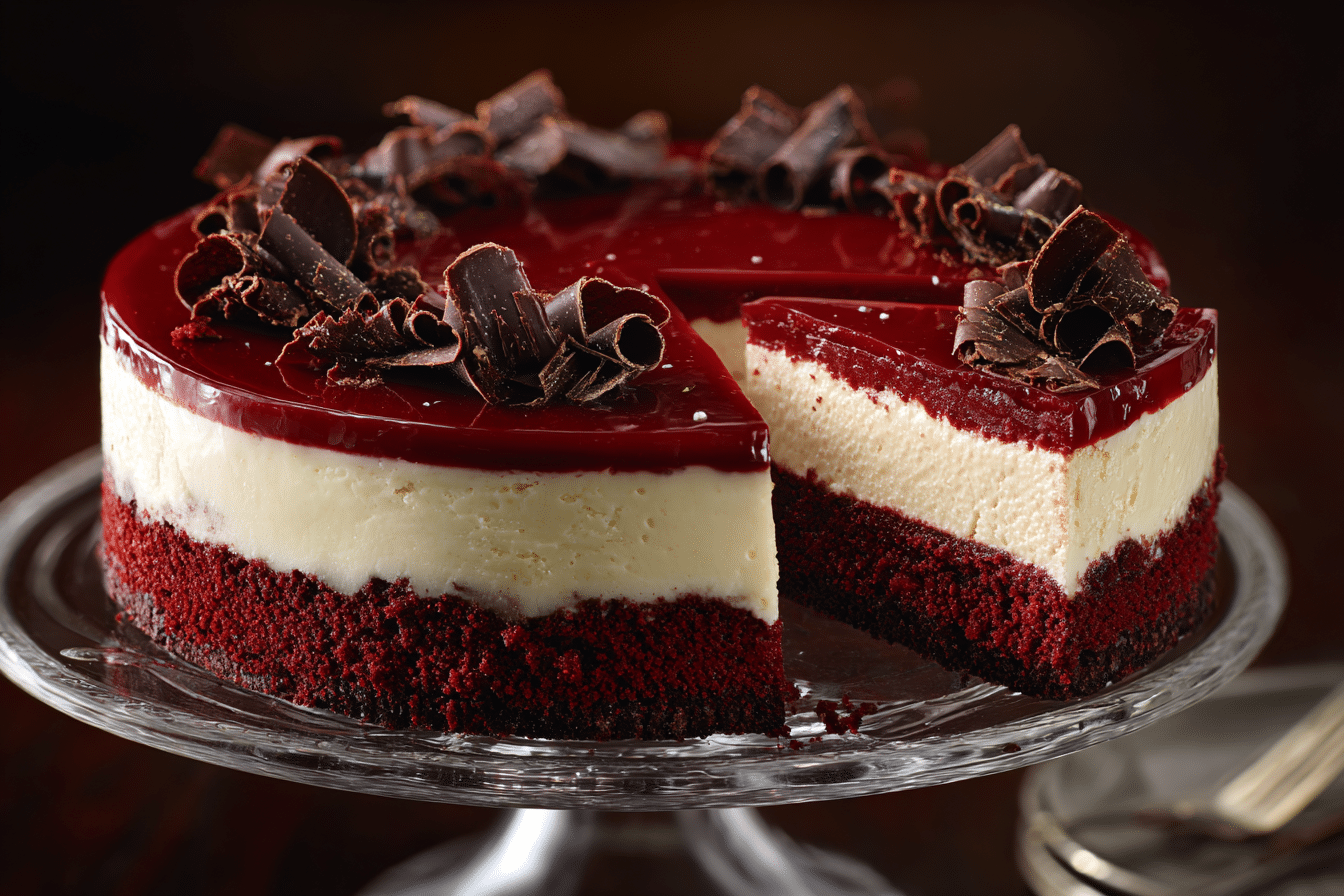
Rich, decadent, and unforgettable—this red velvet cheesecake is a bold twist on two iconic desserts. With its velvety red hue, buttery chocolate undertones, and luscious cream cheese swirls, this dessert isn’t just a treat—it’s an experience. Each bite is a play of textures: smooth, creamy filling meets a buttery cookie crust, all crowned with a tangy-sweet topping that seals the deal.
The moment it hits the table, it becomes the centerpiece. It’s the kind of dessert people talk about long after the last bite. Whether you’re making it for a birthday, Valentine’s Day, or simply because you deserve something amazing, this red velvet cheesecake delivers in flavor and style. And surprisingly, it’s more approachable to make than it looks.
Let’s take a deep dive into how to make the most sensational red velvet cheesecake right from your kitchen.
Ingredients Overview
Each component in this red velvet cheesecake serves a distinct purpose—not just for taste, but for texture and balance.
Cream Cheese
The heart of the cheesecake. Use full-fat block cream cheese for the richest flavor and smoothest texture. Softened to room temperature, it blends seamlessly.
Granulated Sugar
Sweetens the cheesecake filling without overpowering. It also helps break down the cream cheese during mixing for that ultra-creamy finish.
Eggs
They provide structure. Be sure to add them one at a time and mix just until combined. Overbeating can lead to cracks.
Sour Cream
Adds tang and a silky texture. It lightens the density of the filling just enough.
Buttermilk
Authentic to red velvet flavor, buttermilk lends a subtle tang that plays beautifully with cocoa and cream cheese. No buttermilk? Mix 1 tablespoon vinegar or lemon juice with enough milk to reach 1 cup.
Unsweetened Cocoa Powder
Key to that red velvet depth. Use natural (not Dutch-processed) cocoa to react properly with the acid in the buttermilk and vinegar.
Red Gel Food Coloring
A little goes a long way. Gel-based color ensures a vibrant hue without watering down the batter.
Vanilla Extract
Adds warmth and rounds out the flavor.
White Vinegar
Traditional in red velvet recipes, it works with baking soda for lift and brightens the flavor.
Oreo or Chocolate Wafer Crust
Crushed chocolate cookies with melted butter make a rich, slightly crunchy crust that contrasts the creamy filling perfectly.
Optional White Chocolate Ganache or Whipped Cream
To top it off with something soft, sweet, and elegant.
Step-by-Step Instructions
-
Prepare the Pan
Grease a 9-inch springform pan. Wrap the outside with foil to prevent leaks during the water bath. Preheat oven to 325°F (163°C). -
Make the Crust
Pulse 24 Oreos (or chocolate wafers) in a food processor. Mix with 5 tablespoons melted butter. Press firmly into the bottom of the pan. Bake for 10 minutes. Set aside to cool. -
Beat the Cream Cheese
In a large bowl, beat 4 (8 oz) packages of softened cream cheese until smooth, about 2–3 minutes. Scrape down the bowl frequently. -
Add Sugar and Cocoa
Add 1 ¼ cups granulated sugar and 2 tablespoons unsweetened cocoa powder. Mix on medium-low until combined. -
Incorporate Wet Ingredients
Add ¾ cup sour cream, ½ cup buttermilk, 1 tablespoon white vinegar, and 1 tablespoon vanilla extract. Mix until smooth. -
Add the Eggs
Add 4 large eggs, one at a time, mixing on low just until incorporated. Do not overmix. Stir in 2 teaspoons red gel food coloring until evenly blended. -
Prepare Water Bath
Place the springform pan into a larger roasting pan. Pour in boiling water around the cheesecake until it reaches halfway up the sides. This prevents cracking and promotes even baking. -
Bake
Bake for 1 hour and 10–15 minutes. The edges should look set but the center will still jiggle slightly. -
Cool Slowly
Turn off the oven, crack the door slightly, and let the cheesecake rest for 1 hour. Then remove from the water bath and let it cool at room temperature. -
Chill
Refrigerate for at least 6 hours or overnight before slicing. This step is crucial for texture and clean cuts. -
Top (Optional)
Before serving, spread a thin layer of white chocolate ganache or piped whipped cream over the top. Garnish with red velvet crumbs or chocolate curls if desired.
Tips, Variations & Substitutions
Room Temperature Ingredients
Always start with room temp ingredients to ensure a smooth, lump-free batter.
Avoid Overmixing
Once the eggs go in, stir gently. Overmixing adds air, which causes cracks.
Make It Gluten-Free
Use gluten-free chocolate cookies for the crust. The filling is naturally gluten-free.
Add a Chocolate Swirl
Drop a few spoonfuls of melted chocolate into the batter before baking and swirl with a knife for a stunning marbled effect.
Try a White Chocolate Topping
Instead of whipped cream, pour cooled white chocolate ganache over the top for extra decadence.
Add a Raspberry Layer
For a tart-sweet surprise, spread raspberry preserves between the crust and filling before baking.
No Water Bath?
If you’re short on time, bake low and slow without the bath. It might crack slightly, but still tastes incredible.
Serving Ideas & Occasions
Red velvet cheesecake makes a jaw-dropping dessert for holidays, romantic dinners, birthdays, or bridal showers. Its bold color and dramatic presentation feel special without needing extra décor.
Pair it with a glass of cold milk, a flute of champagne, or freshly brewed coffee. Serve it chilled in thin slices—it’s rich enough to satisfy with just a modest portion.
For a Southern-themed dinner, serve after fried chicken and collard greens. Or make it the star of a Valentine’s dinner with chocolate-dipped strawberries on the side.
It also keeps well, making it a smart make-ahead dessert for entertaining.
Nutritional & Health Notes
A slice of red velvet cheesecake is undoubtedly indulgent. Cream cheese, sour cream, and eggs offer richness and protein, while the crust adds carbohydrates and crunch.
There’s no way around the sugar and fat in this dessert, but that’s part of its charm—it’s a once-in-a-while treat meant to be savored.
To reduce calories slightly, try using light cream cheese and reduced-fat sour cream. You can also opt for a smaller slice and skip the whipped topping to keep things more balanced.
For those watching food dyes, natural beet-based coloring can substitute for red gel, though the hue may be more muted.
FAQs
1. Can I make red velvet cheesecake without food coloring?
Yes, you can skip the food coloring entirely or use a natural alternative like beet powder or pureed beets. The flavor will stay rich, though the vibrant red hue will be less pronounced.
2. How do I prevent my cheesecake from cracking?
Using a water bath and avoiding overmixing once the eggs are added are key. Also, let the cheesecake cool slowly in the oven before removing—it helps the structure set gently.
3. Can I freeze red velvet cheesecake?
Absolutely. Wrap slices tightly in plastic wrap and foil, then freeze for up to 2 months. Thaw in the fridge overnight before serving. It holds its texture beautifully.
4. What’s the best way to get clean slices?
Use a long, sharp knife dipped in hot water and wiped dry between each cut. This keeps the slices smooth and professional-looking.
5. Can I use store-bought crust?
Yes, a premade chocolate cookie crust can work, though it’s usually smaller than needed. Consider pressing it into a springform pan and reinforcing with extra crumbs.
6. How far ahead can I make red velvet cheesecake?
It’s best made a day ahead so it can chill completely. It stays fresh in the fridge for up to 5 days, making it ideal for planning ahead.
7. What’s the difference between red velvet cake and red velvet cheesecake?
Red velvet cake is a soft, cocoa-flavored sponge with cream cheese frosting. Red velvet cheesecake combines that flavor with the dense, creamy richness of a traditional cheesecake for a totally different texture and taste profile.
Creamy Red Velvet Cheesecake with Chocolate Accents
This stunning red velvet cheesecake features a rich cocoa-infused filling, creamy texture, and a chocolate cookie crust, making it perfect for holidays, special occasions, or anytime you want an impressive dessert.
- Prep Time: 30 minutes
- Cook Time: 1 hour 15 minutes
- Total Time: 7 hours (includes chilling)
- Yield: 12 servings
Ingredients
For the crust:
24 Oreo cookies or chocolate wafers
5 tablespoons unsalted butter, melted
For the filling:
4 (8 oz) packages cream cheese, softened
1 ¼ cups granulated sugar
¾ cup sour cream
½ cup buttermilk
4 large eggs
2 tablespoons unsweetened cocoa powder
1 tablespoon vanilla extract
1 tablespoon white vinegar
2 teaspoons red gel food coloring
Optional topping:
White chocolate ganache or whipped cream
Instructions
-
Preheat oven to 325°F (163°C). Grease a 9-inch springform pan and wrap the outside with foil.
-
Make the crust: Combine cookie crumbs and melted butter. Press into pan. Bake for 10 minutes. Cool.
-
Beat cream cheese until smooth. Add sugar and cocoa, mix until combined.
-
Add sour cream, buttermilk, vinegar, and vanilla. Mix until smooth.
-
Add eggs one at a time, mixing gently. Stir in red food coloring.
-
Pour batter over cooled crust.
-
Place pan in roasting pan and fill with boiling water halfway up sides.
-
Bake 1 hour 10–15 minutes, until edges are set and center slightly jiggles.
-
Cool in oven 1 hour with door ajar. Remove and cool to room temp.
-
Chill at least 6 hours or overnight.
-
Top with ganache or whipped cream if desired before serving.
Notes
Use room temperature ingredients.
Don’t overmix after adding eggs.
For gluten-free, use gluten-free cookies for crust.
Chill overnight for best texture and clean slices.