
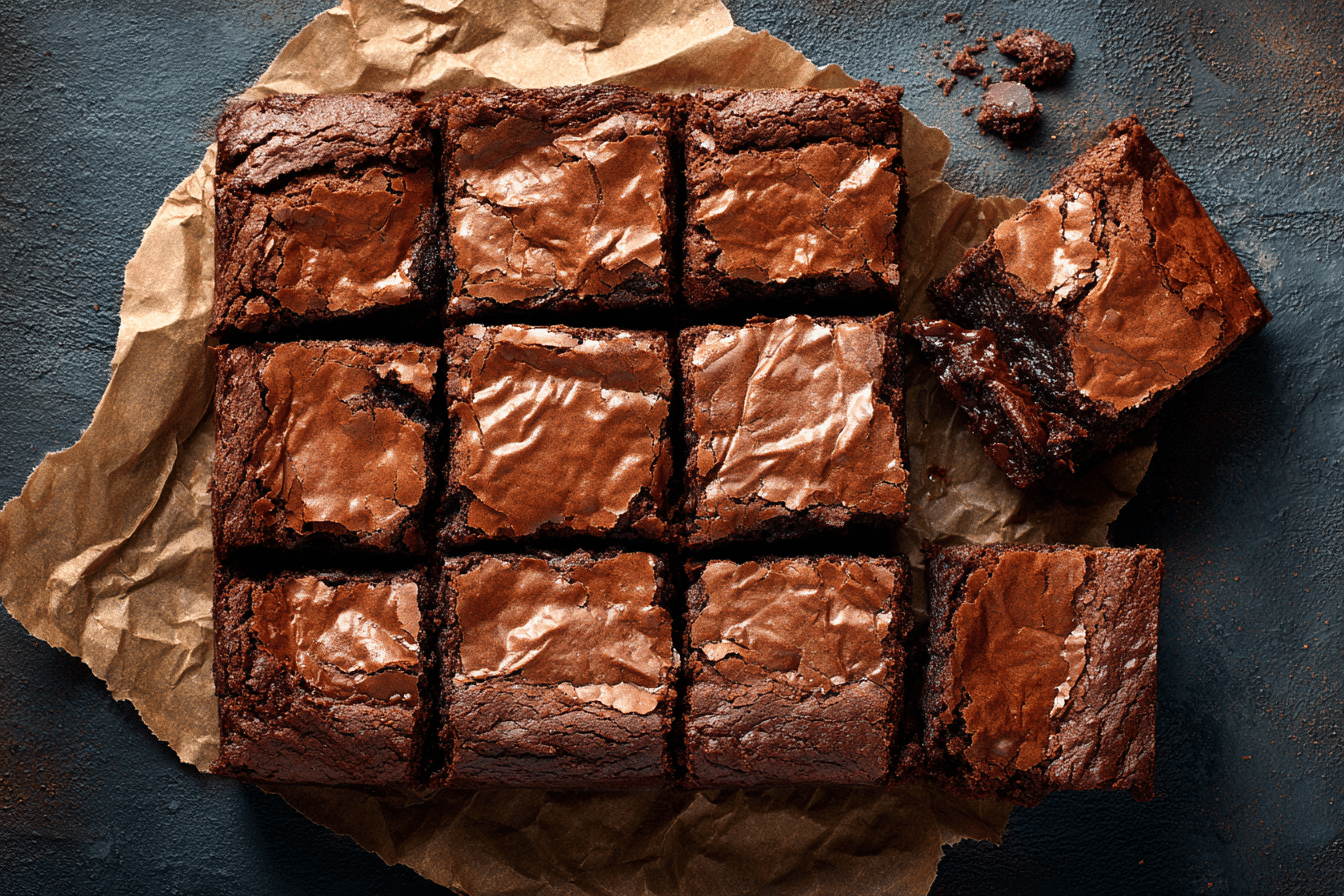
When only the Best Brownies Ever will do, this recipe delivers everything a true brownie lover craves: a crackly top, a chewy edge, a gooey center, and that deep, bold chocolate flavor that lingers with every bite.
These brownies strike the perfect balance — they’re rich but not heavy, sweet but not cloying, and indulgent yet surprisingly easy to make. Born from years of testing and tweaking, this no-fail recipe uses real dark chocolate, just the right amount of cocoa, and a carefully chosen sugar-to-fat ratio that guarantees that signature fudgy bite every time.
Skip the boxed mix and pull out one bowl — this is your new go-to brownie.
Ingredients Overview
Each ingredient in this recipe is carefully selected for maximum flavor and perfect texture:
Core Ingredients
-
Butter: Melted butter gives the brownies richness and a dense, melt-in-your-mouth feel. Use unsalted to control salt levels.
-
Dark Chocolate: A high-quality bar (60–70% cocoa) adds intense chocolate flavor and helps create a gooey base.
-
Cocoa Powder: Adds depth and balances the melted chocolate. Dutch-process gives a smooth finish; natural cocoa adds a bit of brightness.
-
Sugar: Granulated sugar is key to that glossy, crackled top. It also helps the brownies set just right.
-
Brown Sugar (optional): A touch adds chewiness and a subtle molasses note.
-
Eggs: Provide structure and richness. Whisking them with sugar helps create the shiny top.
-
All-Purpose Flour: Use sparingly — just enough to bind, but not enough to make them cakey.
-
Salt: A little salt deepens the chocolate and balances the sweetness.
-
Vanilla Extract: Rounds out the chocolate and adds a warm, comforting undertone.
Optional Add-Ins
-
Chocolate chunks or chips for extra gooey bites
-
Walnuts or pecans for crunch
-
Espresso powder to intensify chocolate flavor
Substitution Tips
-
Gluten-Free: Use a 1:1 gluten-free flour blend.
-
Dairy-Free: Use vegan butter and check that your chocolate is dairy-free.
-
Refined Sugar-Free: Try coconut sugar, but note the crackly top may not form the same way.
Step-by-Step Instructions
1. Melt Butter and Chocolate
In a heatproof bowl over simmering water (or using short microwave bursts), melt butter and dark chocolate together. Stir until smooth, glossy, and completely melted. Remove from heat and let cool slightly.
2. Mix in Sugar and Eggs
Whisk granulated sugar (and brown sugar, if using) into the warm chocolate mixture. Add the eggs, one at a time, whisking well after each addition. This step helps form that shiny top.
Stir in the vanilla extract.
3. Add Dry Ingredients
Sift in cocoa powder, flour, and salt. Use a spatula to fold everything together just until no dry streaks remain. The batter will be thick and glossy.
If using chocolate chunks, nuts, or other mix-ins, fold them in now.
4. Bake
Line an 8×8-inch square baking pan with parchment paper and lightly grease.
Pour the batter into the pan, spreading evenly.
Bake in a preheated 175°C (350°F) oven for 25–30 minutes, or until the edges are set and a toothpick inserted into the center comes out with moist crumbs (not wet batter).
5. Cool and Slice
Let brownies cool completely in the pan — at least 1 hour. This helps them set and intensifies the fudgy texture.
For clean cuts, use a sharp knife and wipe it between slices. You can chill them for 20–30 minutes for neater slicing.
Tips, Variations & Substitutions
Expert Tips
-
Use room temperature eggs for better blending and texture.
-
Whisk the eggs and sugar thoroughly to get that beautiful crinkle-top.
-
Don’t overbake — it’s better to slightly underbake and let the carryover heat finish the job.
-
Use parchment paper for easy removal and cleaner presentation.
Flavor Variations
-
Peanut Butter Swirl: Drop dollops of peanut butter on top before baking and swirl with a knife.
-
Salted Caramel: Swirl in thick caramel and top with sea salt flakes.
-
S’mores: Add graham cracker pieces and mini marshmallows halfway through baking.
-
Triple Chocolate: Fold in dark, milk, and white chocolate chunks.
Dietary Modifications
-
Vegan: Use flax eggs and vegan chocolate/butter, but note that texture will be slightly less firm.
-
Lower Sugar: Reduce sugar by ¼ cup; they’ll still be rich but slightly less sweet.
Serving Ideas & Occasions
These brownies are endlessly versatile and perfect for:
-
Casual snacking with a glass of milk
-
Party platters or dessert buffets
-
Layered in ice cream sundaes
-
Cut into cubes for fondue
-
Lunchbox treats or midweek pick-me-ups
Serve warm for an ultra-gooey treat, or chilled for a denser, truffle-like experience. Add:
-
A scoop of vanilla or salted caramel ice cream
-
A dusting of powdered sugar or cocoa
-
A drizzle of ganache or melted peanut butter
Nutritional & Health Notes
These brownies are indulgent and made for enjoying — but there are still some benefits tucked inside:
-
Dark chocolate provides antioxidants and flavonoids
-
Cocoa offers mood-boosting and heart-healthy compounds
-
Moderate portion sizes make them a satisfying yet mindful dessert
Want to lighten them up?
-
Cut into 16 small squares instead of 9 large
-
Use 70% dark chocolate for less sugar
-
Reduce butter slightly and add 2 tbsp Greek yogurt
FAQs
Q1: What makes these brownies the “best ever”?
A1: It’s the perfect ratio of butter, chocolate, and sugar, plus a smart mix of real chocolate and cocoa for deep flavor. Whisking the eggs well creates the shiny top, and minimal flour keeps them fudgy.
Q2: Can I double the recipe?
A2: Yes, double everything and use a 9×13-inch pan. Bake for 35–40 minutes, checking early to avoid overbaking.
Q3: How do I store these brownies?
A3: Store in an airtight container at room temperature for 3–4 days, or refrigerate for up to a week. They also freeze beautifully for up to 3 months.
Q4: Why don’t my brownies have a shiny top?
A4: The shiny top comes from properly emulsifying the sugar and eggs with the warm chocolate. Make sure to whisk thoroughly and don’t skip the sugar.
Q5: Can I make them gluten-free?
A5: Yes! Use a 1:1 gluten-free baking flour. Brownies are very forgiving when it comes to flour swaps due to their low flour content.
Q6: Can I bake them in a muffin tin?
A6: Definitely. Reduce baking time to 18–22 minutes and use cupcake liners. Great for individual portions.
Q7: Can I underbake them slightly?
A7: Yes — it’s actually preferred for fudgy texture. Pull them out when the center still looks soft; they’ll continue to cook as they cool.
PrintBest Brownie Recipe – Glossy Tops & Soft, Dense Centers
These brownies are the ultimate treat — dense, gooey, and packed with chocolate. Crackly tops, chewy edges, and a rich, fudgy middle make them the best brownies ever.
- Prep Time: 15 minutes
- Cook Time: 30 minutes
- Total Time: 45 minutes
- Yield: 9–16 brownies 1x
Ingredients
-
115g (½ cup) unsalted butter
-
170g (6 oz) dark chocolate (60–70% cocoa), chopped
-
¾ cup granulated sugar
-
¼ cup brown sugar (optional, for chew)
-
2 large eggs
-
1 tsp vanilla extract
-
⅓ cup unsweetened cocoa powder
-
½ cup all-purpose flour
-
½ tsp salt
-
Optional: ½ cup chocolate chips or nuts
Instructions
-
Preheat oven to 175°C (350°F). Line an 8×8-inch pan with parchment.
-
Melt butter and chocolate together. Stir until smooth.
-
Whisk in sugars, then eggs one at a time, followed by vanilla.
-
Sift in cocoa powder, flour, and salt. Fold until just combined.
-
Stir in any mix-ins. Pour into prepared pan.
-
Bake 25–30 minutes, or until set at the edges and the center is slightly soft.
-
Cool fully before slicing.
Notes
-
For taller brownies, bake in a 7×7-inch pan.
-
Freeze slices individually wrapped for up to 3 months.
-
Best eaten within 3–4 days for freshest texture.