
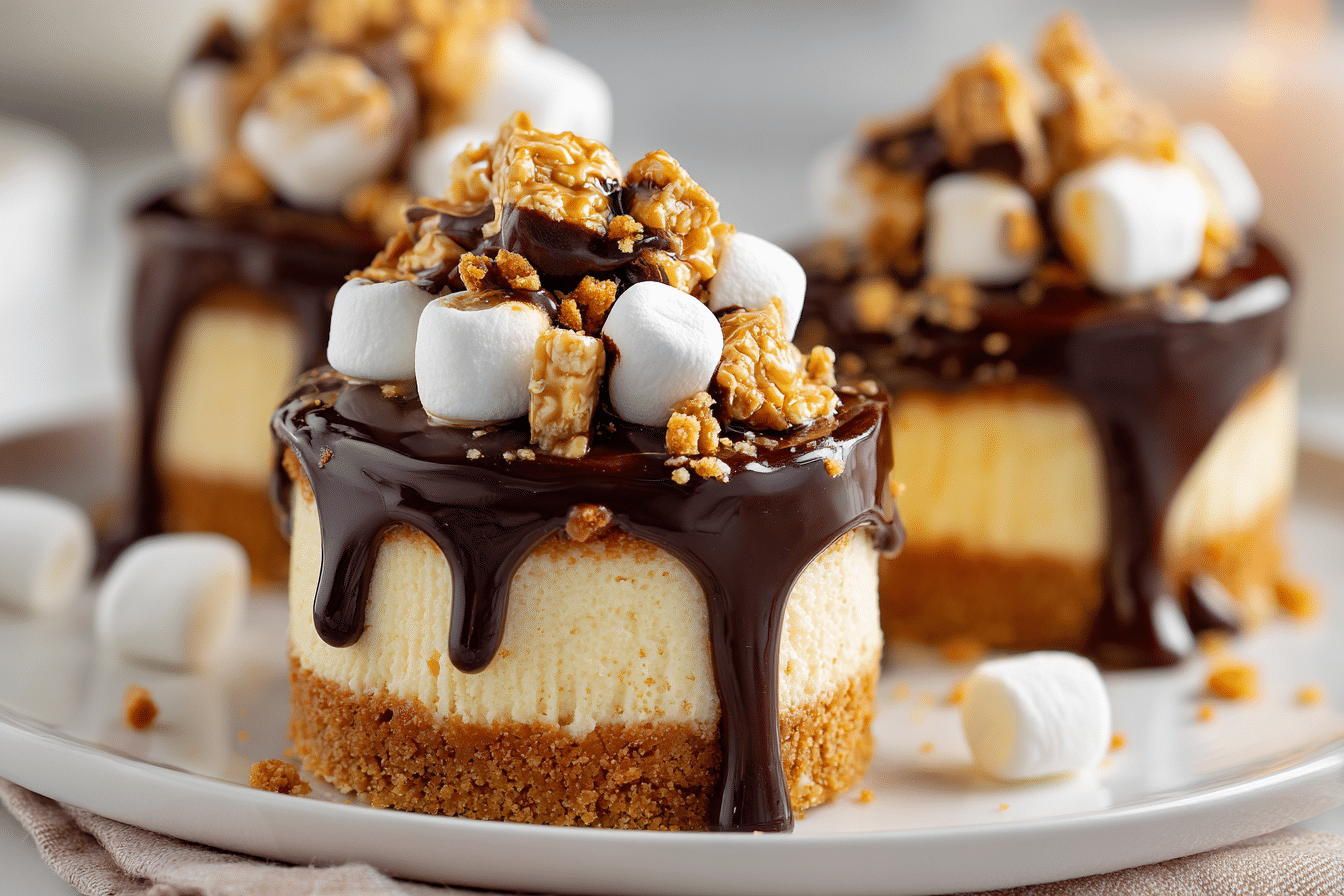
Mini Chocolate Cheesecake Bites are the perfect combination of creamy, rich cheesecake and intense chocolate, all packed into a single, irresistible bite. These mini desserts are easy to make, stunning to serve, and guaranteed to be the first to disappear at any gathering.
With a buttery chocolate cookie crust and a silky-smooth chocolate cream cheese filling, each bite delivers the indulgent flavor of a full-sized cheesecake — but without the hassle. They’re great for parties, holidays, or anytime you want a make-ahead dessert that looks as good as it tastes.
Ingredients Overview
Making these bites involves three components: a chocolate cookie crust, a rich chocolate cheesecake filling, and optional toppings for flair. Here’s what you’ll need:
For the Crust:
-
Chocolate Sandwich Cookies (like Oreos): Crushed into fine crumbs, they make a perfectly sweet and crunchy base.
-
Butter: Melted and mixed with the crumbs to bind the crust and help it set.
For the Filling:
-
Cream Cheese: Use full-fat, room-temperature cream cheese for a smooth, rich texture.
-
Granulated Sugar: Sweetens the cheesecake and balances the bitterness of the chocolate.
-
Egg: Provides structure and helps the filling set.
-
Sour Cream: Adds tang and creaminess, enhancing the overall smoothness.
-
Vanilla Extract: Deepens the chocolate flavor.
-
Dark Chocolate (60–70%): Melted and incorporated into the batter for a luxurious chocolate flavor.
-
Salt: Just a pinch to balance the sweetness.
Optional Toppings:
-
Whipped cream
-
Chocolate shavings or curls
-
Berries or fruit compote
-
Mini chocolate chips or ganache drizzle
Substitution Ideas:
-
Gluten-Free: Use gluten-free chocolate cookies for the crust.
-
Dairy-Free: Use dairy-free cream cheese (like Kite Hill) and vegan butter for the crust. Choose dairy-free dark chocolate and omit the sour cream or replace it with a plant-based alternative.
-
No Bake Version: Skip the egg and bake time, and use a stabilized cream cheese-chocolate mixture chilled in the fridge (see tips section).
Step-by-Step Instructions
1. Preheat Oven and Prepare Pan
Preheat your oven to 325°F (163°C). Line a mini muffin pan with paper liners or use a silicone pan for easy release.
This recipe makes about 24 mini cheesecakes, depending on the size of your muffin tin.
2. Make the Crust
In a food processor, pulse:
-
15 chocolate sandwich cookies
-
3 tablespoons melted unsalted butter
Process until the mixture resembles wet sand. Spoon 1 tablespoon of the mixture into each mini muffin liner and press down firmly with your fingers or the back of a spoon.
Bake the crusts for 5 minutes, then remove from the oven and let cool slightly.
3. Melt the Chocolate
Melt 4 oz dark chocolate in the microwave in 20-second bursts, stirring in between until smooth. Set aside to cool slightly before adding to the filling.
4. Prepare the Cheesecake Filling
In a large bowl, beat:
-
8 oz cream cheese (room temp)
-
1/4 cup granulated sugar
Beat until smooth and creamy, about 2–3 minutes.
Add:
-
1 large egg
-
1/4 cup sour cream
-
1 tsp vanilla extract
-
Pinch of salt
Mix until fully combined. Then add the melted chocolate and beat again until the batter is smooth and glossy.
5. Fill and Bake
Divide the filling evenly among the pre-baked crusts. Fill each liner almost to the top.
Bake at 325°F for 14–16 minutes, or until the centers are just set and slightly jiggly.
Remove from the oven and allow to cool in the pan for 10 minutes, then transfer to a wire rack to cool completely.
6. Chill
Refrigerate the cheesecakes for at least 2 hours, or preferably overnight. This allows the texture to firm up and develop its full flavor.
7. Add Toppings (Optional)
Just before serving, top each bite with:
-
A dollop of whipped cream
-
Chocolate curls or drizzle
-
Fresh raspberries or strawberries
This adds elegance and texture contrast.
Tips, Variations & Substitutions
-
Make Ahead: These bites can be made up to 3 days in advance and stored in the fridge.
-
Freeze for Later: Freeze in a sealed container for up to 2 months. Thaw in the fridge overnight before serving.
-
Mini No-Bake Version: Use the same crust, but skip the egg and instead fold the melted chocolate into whipped cream cheese + whipped cream. Chill for 4 hours.
-
Add a Flavor Twist:
-
Mix in 1/2 tsp espresso powder for mocha cheesecake bites.
-
Add orange zest to the batter for a chocolate-orange combo.
-
Use mint extract in the filling and top with crushed mint candies.
-
Serving Ideas & Occasions
Mini chocolate cheesecake bites are versatile and elegant enough for any occasion:
-
Party platters: Add to dessert boards alongside mini tarts and cookies.
-
Valentine’s Day: Top with strawberries and heart-shaped sprinkles.
-
Holiday cookie swaps: They travel well and look festive with colorful toppings.
-
Dinner parties: A fancy yet fuss-free dessert that looks like it came from a bakery.
-
Casual snacks: Pair with espresso or cold brew for a sweet afternoon break.
Nutritional & Health Notes
Each mini bite is portion-controlled and rich enough to satisfy with just one (or two).
-
Calories: ~120–140 per cheesecake bite
-
Fat: Balanced between cream cheese and chocolate; for lower fat, use Neufchâtel cheese
-
Sugar: You can reduce sugar slightly without compromising flavor
-
Protein: Small amounts from the egg and cheese
-
Allergy Friendly Tips: Easily adaptable to gluten-free or dairy-free needs
Overall, they’re a great way to enjoy a decadent treat in a small, manageable serving.
FAQs
Q1: Why did my mini cheesecakes crack?
A1: Cracks can happen if the cheesecakes are overbaked or cooled too quickly. Bake just until the centers are set, then cool slowly. A water bath isn’t necessary for minis, but avoid overmixing the batter to reduce air bubbles.
Q2: Can I make these without a mini muffin tin?
A2: Yes, you can use a standard muffin tin, but increase the baking time to 18–20 minutes. You’ll get around 10–12 larger cheesecake bites.
Q3: How do I know when the bites are done baking?
A3: The edges should be firm and the center slightly jiggly. They’ll firm up more as they cool. Don’t wait for them to be fully firm in the oven.
Q4: Can I make these without a crust?
A4: Yes! Spray a mini muffin pan well with nonstick spray and pour the filling directly in. Bake as directed. You’ll get a crustless, flourless cheesecake bite.
Q5: Can I make these with milk chocolate?
A5: You can, but the flavor will be much sweeter and less intense. If you prefer a richer chocolate flavor, stick with dark chocolate (60–70%).
Q6: How long can I store these?
A6: Store in the fridge for up to 5 days or freeze for 2 months. Always thaw in the refrigerator before serving.
Q7: What kind of chocolate is best?
A7: Use a bar of high-quality dark chocolate for melting. Brands like Ghirardelli, Valrhona, or Lindt melt smoothly and give a luxurious texture.
PrintChocolate Cheesecake Bites with Creamy, Rich Filling
Mini chocolate cheesecake bites with a rich cookie crust and silky chocolate filling. Perfect for parties, holidays, or anytime chocolate cravings strike.
- Prep Time: 20 minutes
- Cook Time: 16 minutes
- Total Time: 2 hours 40 minutes
- Yield: 24 mini cheesecakes 1x
Ingredients
Crust:
-
15 chocolate sandwich cookies (e.g., Oreos)
-
3 tbsp unsalted butter, melted
Filling:
-
8 oz cream cheese, room temperature
-
1/4 cup granulated sugar
-
1 large egg
-
1/4 cup sour cream
-
1 tsp vanilla extract
-
Pinch of salt
-
4 oz dark chocolate, melted
Instructions
-
Preheat oven to 325°F (163°C) and line a mini muffin tin with liners.
-
Pulse cookies and butter in food processor until crumbly. Press into liners. Bake crusts for 5 minutes.
-
Melt chocolate and set aside to cool.
-
Beat cream cheese and sugar until smooth. Add egg, sour cream, vanilla, and salt. Mix until fully combined.
-
Stir in melted chocolate.
-
Spoon filling over crusts. Bake for 14–16 minutes until centers are set.
-
Cool completely, then chill for at least 2 hours.
-
Add toppings if desired before serving.
Notes
Store chilled for up to 5 days or freeze for 2 months. Add espresso or orange zest for flavor variations.