
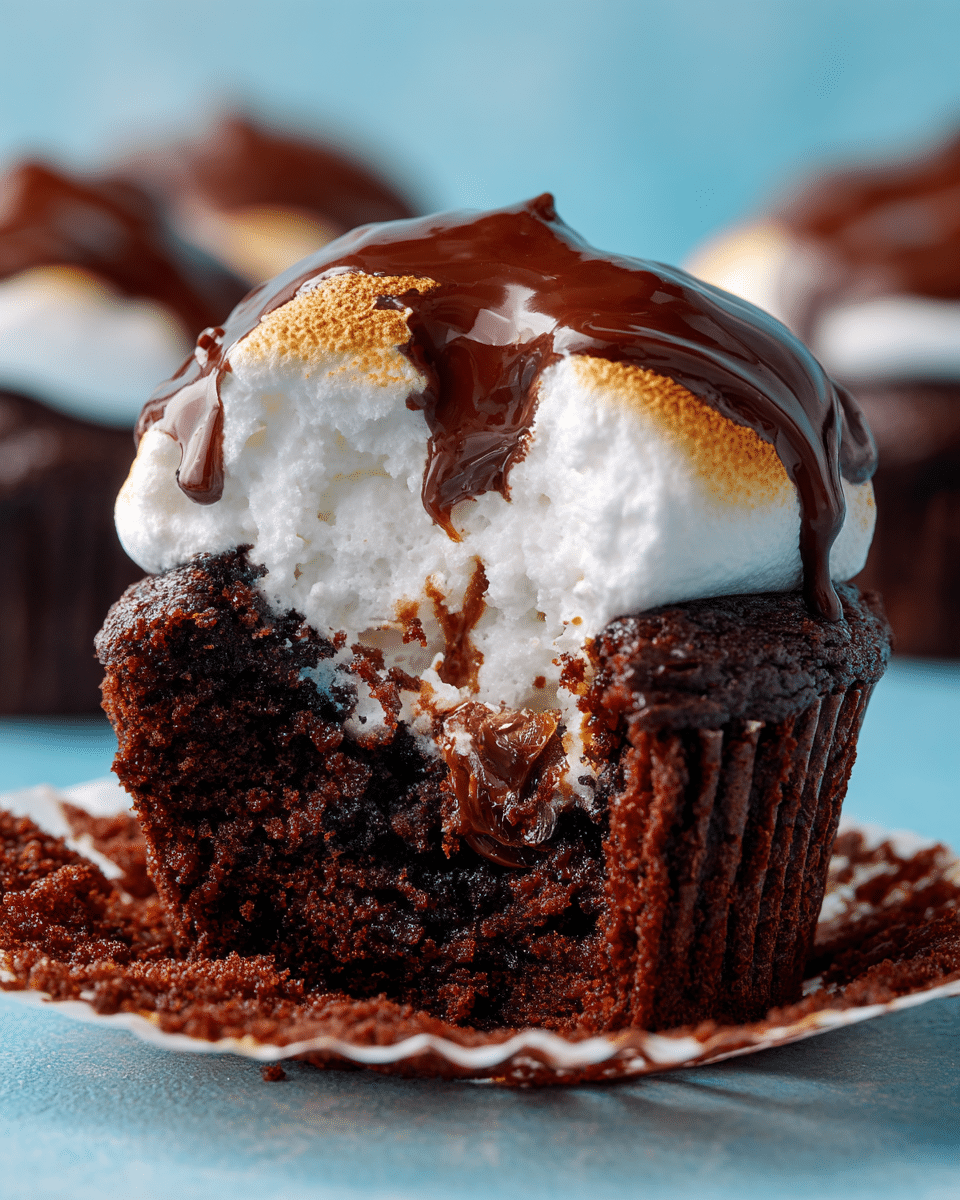
These Marshmallow Cupcakes are a joyful treat that combine soft vanilla cupcakes with gooey marshmallow filling and a cloud-like marshmallow frosting on top. Whether you’re baking for a birthday, party, or just a playful weekend project, these cupcakes are light, whimsical, and absolutely irresistible.
With every bite, you’ll get tender cake, sweet marshmallow center, and a pillowy topping that tastes just like your favorite childhood treat.
The Cupcake That’s Part Campfire, Part Bakery Treat
Marshmallows are one of those nostalgic ingredients that instantly bring joy—whether toasted over a fire or melted into hot chocolate. So why not turn that comforting, gooey magic into a cupcake?
These marshmallow cupcakes are made with a light vanilla cake base, but the real fun starts inside. Each cupcake hides a gooey marshmallow or marshmallow fluff center, and is topped with a whipped, glossy marshmallow-style frosting.
Perfect for:
-
Birthday parties
-
Bake sales
-
Spring or Easter treats
-
Campfire-themed desserts
-
Anyone who LOVES marshmallows (kids and grown-ups alike!)
Ingredients Overview: Soft, Sweet, and Simple
Cupcake Base
-
All-purpose flour: The structure of your cupcake.
-
Granulated sugar: Adds sweetness and helps with browning.
-
Unsalted butter: Adds moisture and richness.
-
Eggs: Bind the batter and give lift.
-
Milk: Keeps the texture light.
-
Vanilla extract: Boosts the sweet marshmallow flavor.
Filling Options
-
Mini marshmallows: Place in the center before baking for a melted middle.
-
Marshmallow fluff: Add after baking by piping into the center.
-
Stuffed marshmallows (like chocolate-filled or strawberry): For flavor variety.
Marshmallow Frosting
-
A glossy 7-minute style frosting made with:
-
Egg whites
-
Sugar
-
Cream of tartar or lemon juice
-
Vanilla extract
-
It’s fluffy, stable, and spreadable—like a toasted marshmallow dream!
Step-by-Step Instructions: Fluffy Cupcakes with a Gooey Core
Step 1: Make the Cupcakes
Ingredients:
-
1½ cups (190g) all-purpose flour
-
1½ tsp baking powder
-
¼ tsp salt
-
½ cup (115g) unsalted butter, softened
-
¾ cup (150g) granulated sugar
-
2 large eggs
-
1 tsp vanilla extract
-
½ cup (120ml) whole milk
Instructions:
-
Preheat oven to 350°F (175°C). Line a 12-cup muffin tin with cupcake liners.
-
In a medium bowl, whisk together flour, baking powder, and salt.
-
In a large bowl, beat butter and sugar until light and fluffy.
-
Add eggs one at a time, beating well after each addition. Stir in vanilla.
-
Alternate adding flour mixture and milk, beginning and ending with flour.
-
Divide batter between cupcake liners, filling about ¾ full.
-
Bake for 18–20 minutes, or until a toothpick comes out clean.
-
Let cool completely before filling or frosting.
Step 2: Fill with Marshmallow
Once cupcakes are cool:
-
Use a small knife or cupcake corer to remove the center.
-
Fill each cupcake with:
-
A scoop of marshmallow fluff, OR
-
A mini marshmallow, slightly melted, for a gooey center.
-
-
Replace the top if desired, or leave open for frosting.
Step 3: Make Marshmallow Frosting (7-Minute Style)
Ingredients:
-
2 large egg whites
-
½ cup (100g) granulated sugar
-
¼ tsp cream of tartar or 1 tsp lemon juice
-
½ tsp vanilla extract
Instructions:
-
In a heatproof bowl set over simmering water (double boiler), whisk egg whites, sugar, and cream of tartar.
-
Whisk constantly until sugar is dissolved and mixture reaches 160°F (71°C) (about 4 minutes).
-
Transfer to stand mixer or use hand mixer. Beat on high until stiff, glossy peaks form (about 6–8 minutes).
-
Beat in vanilla extract.
Step 4: Frost & Decorate
-
Pipe or spoon frosting onto cupcakes in soft swirls.
-
Optional: Torch lightly with a kitchen torch for a toasted marshmallow look.
-
Garnish with:
-
Mini marshmallows
-
Sprinkles
-
Crushed graham crackers (for a s’mores twist)
-
Tips, Variations & Substitutions
Pro Tips
-
Use a kitchen torch to toast the frosting for added flavor and visual appeal.
-
For extra fluffy frosting, use room-temperature egg whites.
-
Don’t overbake the cupcakes—moist crumb is key.
Flavor Variations
-
Chocolate Marshmallow Cupcakes: Add cocoa powder to the cupcake batter.
-
Strawberry Marshmallow: Use strawberry fluff and top with freeze-dried strawberries.
-
S’mores Version: Add crushed graham crackers to the base and a chocolate square inside.
Ingredient Swaps
-
Dairy-Free: Use plant-based milk and butter.
-
Egg-Free Frosting: Try a vegan marshmallow fluff or aquafaba-based meringue.
Serving Ideas & Occasions
These cupcakes are made for:
-
Birthday parties and bake sales
-
Valentine’s Day or Easter desserts
-
Kids’ sleepovers or themed parties
-
Baby showers
-
Just-for-fun baking days
Serve at room temperature, and store in an airtight container for up to 2 days.
Make Ahead Tip: Frosting is best fresh, but cupcakes and filling can be made a day in advance.
Nutrition & Health Notes
These are decadent treats, perfect in moderation and meant to be enjoyed for their sweetness and fun.
Approximate per cupcake (frosted & filled):
-
Calories: ~270
-
Fat: 10g
-
Sugar: 30g
-
Protein: 3g
To lighten up:
-
Use half the frosting per cupcake
-
Choose marshmallow fluff instead of full marshmallows inside
-
Reduce sugar in the batter slightly
Frequently Asked Questions (FAQ)
1. Can I toast the marshmallow frosting without a torch?
Yes! Place cupcakes under the broiler for 1–2 minutes, but watch carefully. Or skip toasting—it’s delicious either way.
2. How long does marshmallow frosting last?
It’s best fresh but will hold its shape for about 24–48 hours. Store at room temp in a sealed container.
3. Can I freeze marshmallow cupcakes?
You can freeze unfrosted cupcakes. Thaw before filling and frosting. Marshmallow frosting doesn’t freeze well.
4. Can I use store-bought marshmallow fluff for frosting?
Not for the topping—it won’t hold shape. But it’s perfect for the filling inside the cupcakes.
5. What’s the best way to fill cupcakes?
Use a cupcake corer or small spoon to remove the center, and pipe in marshmallow fluff using a piping bag or spoon.
6. Can I make these chocolate flavored?
Yes! Add ¼ cup cocoa powder to the flour mix for a chocolate base. You can also use chocolate chips in the batter.
7. Are these safe for children to help make?
Yes! Kids can help mix, fill, and decorate. Supervise if using a torch for toasting the frosting.
PrintChocolate Marshmallow Cupcakes – Sweet, Soft & Irresistible
These Marshmallow Cupcakes feature a soft vanilla base filled with gooey marshmallow and topped with fluffy, glossy marshmallow frosting. Perfect for parties and sweet cravings!
- Prep Time: 20 minutes
- Cook Time: 20 minutes
- Total Time: 40 minutes
- Yield: 12 cupcakes 1x
Ingredients
Cupcakes:
-
1½ cups all-purpose flour
-
1½ tsp baking powder
-
¼ tsp salt
-
½ cup unsalted butter, softened
-
¾ cup granulated sugar
-
2 eggs
-
1 tsp vanilla extract
-
½ cup whole milk
Filling:
-
Marshmallow fluff or mini marshmallows
Frosting:
-
2 egg whites
-
½ cup sugar
-
¼ tsp cream of tartar
-
½ tsp vanilla extract
Instructions
-
Preheat oven to 350°F. Line muffin tin with liners.
-
Cream butter and sugar. Add eggs, vanilla, then flour and milk.
-
Fill liners ¾ full. Bake 18–20 min. Cool completely.
-
Remove centers and fill with marshmallow.
-
Make frosting by heating egg whites, sugar, cream of tartar over simmering water to 160°F.
-
Whip until stiff peaks form, then add vanilla.
-
Pipe frosting on cupcakes. Torch if desired.
Notes
Use marshmallow fluff for filling, not for frosting. Frosting is best fresh. Can make cupcakes ahead and frost day of.