
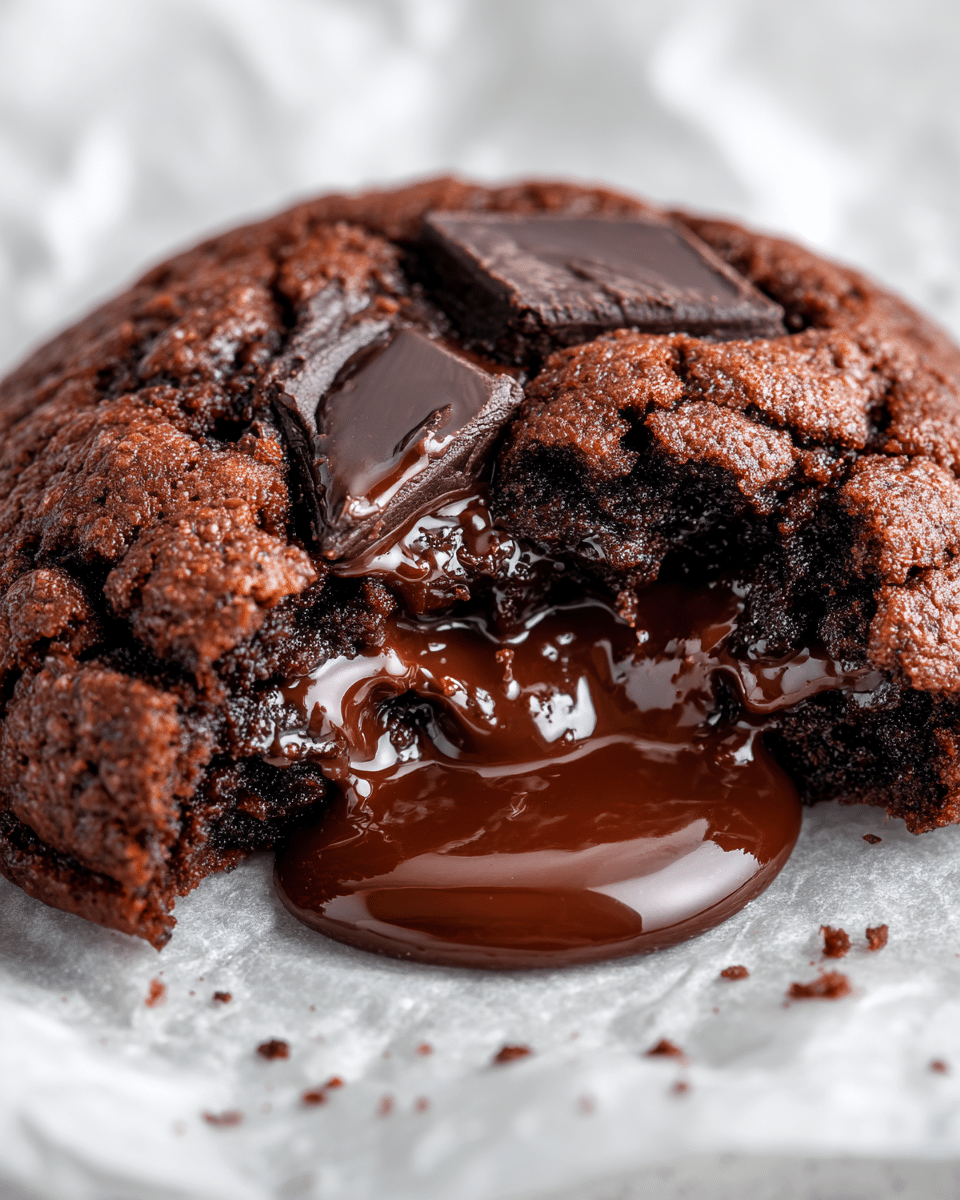
Imagine a cookie with a soft, chewy shell that gives way to a warm, molten chocolate center — that’s exactly what you get with Chocolate Lava Cookies. Inspired by classic lava cakes, these cookies are a decadent fusion of crispy edges and gooey centers, delivering a rich chocolate payoff in every bite.
Perfect for when you want something a little more indulgent than your average chocolate chip cookie, these lava cookies are made for true chocolate lovers. Serve them warm, and you’ll be rewarded with a luscious, brownie-like cookie that oozes molten chocolate from the center. They’re elegant enough for dinner parties, yet easy enough for a casual baking day.
Ingredients Overview
These cookies rely on simple, pantry-friendly ingredients — it’s all in how they’re assembled that makes them magical.
For the Cookie Dough:
-
Unsalted Butter: Softened to room temperature for easy creaming. Adds richness and softness.
-
Brown Sugar & Granulated Sugar: A mix of the two gives chewiness and that cookie-like caramel note.
-
Egg + Egg Yolk: The whole egg provides structure while the extra yolk gives added moisture and tenderness.
-
Vanilla Extract: Enhances the deep chocolate tones.
-
All-Purpose Flour: Keeps the cookie dough sturdy enough to encase the molten center.
-
Cocoa Powder: Use Dutch-process for smooth, dark chocolate flavor.
-
Baking Soda: Helps the cookies rise slightly and spread just the right amount.
-
Salt: Essential to balance out the sweetness and highlight the chocolate.
For the Lava Filling:
-
Chocolate Truffle Centers: You can use baking truffles, chopped chocolate, or even ganache balls frozen in advance. Dark or semi-sweet chocolate works best.
Ingredient Tips:
-
Freeze the filling ahead of time — this keeps it from fully melting into the dough and ensures a lava-like center.
-
Use high-quality chocolate for both the dough and the filling for best flavor.
Step-by-Step Instructions
1. Prepare the Lava Centers
-
Scoop or roll small balls (about 1 tsp) of ganache or chopped chocolate.
-
Freeze for at least 1 hour before baking (overnight works too). This step is critical for a gooey center.
2. Make the Cookie Dough
In a large mixing bowl:
-
Cream together 1/2 cup unsalted butter, 1/2 cup brown sugar, and 1/4 cup granulated sugar until light and fluffy.
-
Beat in 1 large egg and 1 egg yolk, one at a time.
-
Add 1 tsp vanilla extract and mix until smooth.
In a separate bowl:
-
Whisk 1 1/3 cups all-purpose flour, 1/3 cup cocoa powder, 1/2 tsp baking soda, and 1/4 tsp salt.
Gradually add the dry ingredients to the wet, mixing just until combined. The dough will be thick and sticky.
3. Chill the Dough
Cover and refrigerate the dough for 30–45 minutes to make it easier to handle and help prevent spreading.
4. Assemble the Cookies
-
Preheat oven to 350°F (175°C). Line a baking sheet with parchment paper.
-
Scoop about 2 tbsp of cookie dough and flatten slightly.
-
Place a frozen chocolate center in the middle and wrap the dough around it, sealing completely.
-
Roll gently into a ball and place on the prepared baking sheet.
Repeat, spacing cookies about 2 inches apart.
5. Bake
-
Bake for 10–12 minutes, or until the edges are set but the centers still look soft.
-
Let cool on the pan for 5–7 minutes before transferring. Serve warm for the full molten experience.
Tips, Variations & Substitutions
Tips for Lava Success
-
Don’t skip the freezing step: This ensures the filling stays molten.
-
Seal the dough well: If there are gaps, the chocolate may leak during baking.
-
Underdone is better than overdone: The centers should be slightly underbaked for the lava effect.
Variations
-
Peanut Butter Lava: Swap the chocolate center with frozen peanut butter chips or peanut butter ganache.
-
Salted Caramel Lava: Use soft caramel squares or spoonfuls of thick caramel sauce, frozen into balls.
-
Mint Chocolate: Add mint extract to the dough and use mint chocolate squares inside.
Substitutions
-
Gluten-Free: Use a 1:1 gluten-free baking flour blend.
-
Dairy-Free: Use dairy-free butter and dark chocolate.
-
No Egg: Substitute with 1/4 cup applesauce or 1 tbsp flax meal + 3 tbsp water for each egg.
Serving Ideas & Occasions
These cookies shine brightest when served warm, with that molten center still gooey and flowing. Pair with:
-
A scoop of vanilla or espresso ice cream
-
A drizzle of chocolate or caramel sauce
-
Dusting of powdered sugar for contrast
Perfect for:
-
Date nights
-
Dinner parties
-
Valentine’s Day or holiday cookie trays
-
Gifting in cookie boxes (just add reheating instructions)
To reheat, simply microwave a cookie for 10–15 seconds and the center will melt again like magic.
Nutritional & Health Notes
These are indulgent by design — each cookie delivers rich chocolate flavor and satisfying sweetness.
Per cookie (approx. based on 12 servings):
-
~250–280 calories
-
Moderate carbs and fats
-
Small protein boost from eggs and chocolate
For a lighter version:
-
Use less sugar and substitute half with coconut sugar
-
Replace some of the butter with Greek yogurt
-
Opt for dark chocolate with 70%+ cacao
FAQs
Q1: What kind of chocolate works best for the lava center?
A1: Use high-quality dark chocolate or baking truffles. Chopped chocolate bars or frozen ganache are perfect options — they melt evenly and stay gooey.
Q2: Can I make the dough in advance?
A2: Yes, the dough can be chilled for up to 48 hours. Just let it soften slightly before assembling the cookies.
Q3: Can I freeze the cookies after baking?
A3: Yes. Freeze fully baked cookies and reheat in the microwave for 10–15 seconds to reactivate the molten center.
Q4: Why did my lava leak out?
A4: It’s likely the dough wasn’t sealed tightly around the chocolate. Be sure the filling is completely covered before baking.
Q5: Can I make these without cocoa powder?
A5: The cocoa gives the dough its rich flavor — without it, they’ll lose their chocolatey base. If you’re out, try substituting with melted chocolate in the dough (adjust dry ingredients).
Q6: How long will they stay gooey?
A6: They’re best served warm. As they cool, the center will firm up. Reheating will bring back the lava texture.
Q7: How many cookies does this make?
A7: You’ll get about 10–12 medium-sized cookies, depending on how much dough you use per cookie and the size of your lava center.
Easy Chocolate Lava Cookies – Soft Center, Crispy Edge

Chocolate Lava Cookies combine a rich, fudgy chocolate cookie exterior with a surprise molten chocolate center — perfect for when you’re craving a luxurious homemade treat.
- Prep Time: 20 minutes
- Cook Time: 45 minutes
- Total Time: 1 hour 20 minutes
- Yield: 10–12 cookies 1x
Ingredients
Cookie Dough:
-
1/2 cup unsalted butter, softened
-
1/2 cup brown sugar
-
1/4 cup granulated sugar
-
1 large egg
-
1 egg yolk
-
1 tsp vanilla extract
-
1 1/3 cups all-purpose flour
-
1/3 cup unsweetened cocoa powder
-
1/2 tsp baking soda
-
1/4 tsp salt
Lava Center:
-
10–12 pieces of dark chocolate or truffle centers, frozen
Instructions
-
Freeze chocolate centers for at least 1 hour.
-
Cream butter and sugars. Add eggs and vanilla.
-
Whisk flour, cocoa, baking soda, and salt. Mix into wet ingredients.
-
Chill dough 30–45 minutes.
-
Preheat oven to 350°F (175°C). Line a baking sheet with parchment.
-
Scoop 2 tbsp dough, flatten, place frozen chocolate in center, and wrap completely.
-
Bake 10–12 minutes, until edges are set and centers soft.
-
Cool 5 minutes before serving warm.
Notes
-
Use caramel, peanut butter, or mint chocolate for filling variations.
-
Store baked cookies in an airtight container for 3–4 days or freeze.