
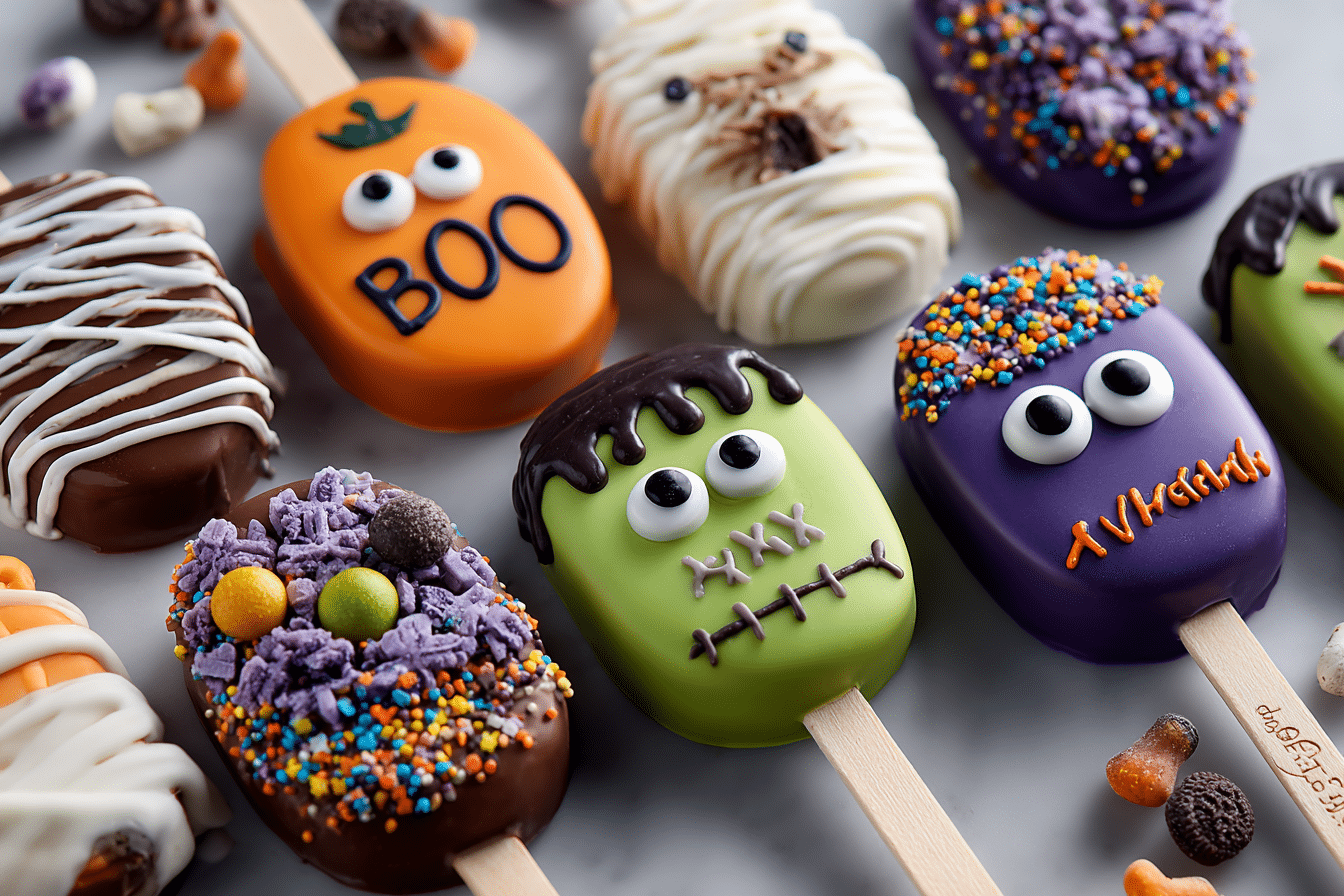
Spooky monster cakesicles are the ultimate Halloween treat — fun, festive, and just the right amount of creepy-cute. These handheld cake pops on a stick are dipped in colorful chocolate coatings, decorated like little monsters, and packed with moist cake and frosting inside. Whether you’re making them for a party, gifting them to friends, or getting creative with kids, these monster cakesicles are guaranteed to steal the show.
They’re surprisingly easy to make using a silicone cakesicle mold and a few decorating basics. You can customize each one with candy eyes, sprinkles, edible glitter, and food-safe markers to create a spooky lineup of ghouls, goblins, and goofy creatures. No baking skills required — just a love for sweet, silly fun.
Ingredients Overview
Monster cakesicles are made from a blend of baked cake and frosting, shaped into pops, and coated in colorful candy melts or chocolate.
Cake crumbs: Use any baked cake — chocolate, vanilla, red velvet, or even store-bought cake. You’ll need about 2½ to 3 cups of cake, crumbled finely.
Frosting: Acts as the glue that holds the cake crumbs together. Buttercream works best, but cream cheese or chocolate frosting are delicious too. You’ll need about ⅓ to ½ cup.
Candy melts or chocolate coating: Used to coat the outside and create vibrant monster shells. Choose Halloween colors like green, purple, orange, black, or white. Candy melts are easy to work with and don’t need tempering.
Sprinkles and decorations:
-
Candy eyeballs
-
Halloween sprinkles
-
Mini chocolate chips
-
Edible markers
-
Colored sugar or glitter
Cakesicle sticks: Flat wooden popsicle sticks or food-safe lollipop sticks that fit into your mold.
Step-by-Step Instructions
-
Prepare the cake mixture:
In a large bowl, crumble 3 cups of baked cake into fine crumbs. Add ⅓ cup frosting and mix until the texture is similar to play dough — moist enough to shape, but not sticky. Add more frosting if too dry. -
Fill the cakesicle molds:
Press about 2 tablespoons of the cake mixture into each cavity of a silicone cakesicle mold, pressing firmly and evenly. Insert sticks into the mold halfway through the mixture, then flatten the backs. Freeze for 10–15 minutes to firm up. -
Melt the candy coating:
In separate microwave-safe bowls, melt your candy melts in 20-second bursts, stirring between each, until smooth. Add ½ teaspoon coconut oil if needed to thin the coating. -
Coat the cakesicles:
Remove chilled cakesicles from the mold. Dip each one into the melted coating or spoon it over, letting excess drip off. Tap gently to smooth. Place on parchment-lined tray. -
Decorate:
Before the coating sets, press on candy eyes, sprinkles, or mini decorations. Use different colors for variety. Let set at room temperature or chill briefly. -
Add monster faces (optional):
Once the coating is set, use edible food markers to draw mouths, scars, or silly features. Let dry before serving or wrapping.
Common Mistakes to Avoid:
-
Using too much frosting: This can make the mixture greasy and hard to shape. Start with less and add gradually.
-
Overheating candy melts: Microwave gently to avoid seizing. Stir well after each interval.
-
Removing from the mold too soon: Freezing helps the cakes hold their shape — don’t skip this step.
Tips, Variations & Substitutions
Helpful tips:
-
Work in batches to keep the cake mixture firm.
-
Use a spoon or offset spatula to smooth coating after dipping.
-
Let kids help decorate — it’s the most fun part!
Flavor variations:
-
Use chocolate cake with peanut butter frosting for a Reese’s-inspired center.
-
Red velvet cake + cream cheese frosting = spooky red filling.
-
Pumpkin spice cake with vanilla frosting for fall flavor.
Substitutions:
-
Use white chocolate tinted with gel food coloring instead of candy melts.
-
Vegan cake and frosting work just as well.
-
Add crushed cookies or candy inside for a crunchy surprise.
Serving Ideas & Occasions
Spooky monster cakesicles are as fun to serve as they are to make. Arrange them on a Halloween platter, stand them up in a decorated jar, or wrap individually for party favors.
Serving suggestions:
-
Serve with hot cocoa or spiced cider at a Halloween party.
-
Add to treat bags for classroom or office fun.
-
Use as edible name cards for Halloween table settings.
Perfect occasions:
-
Halloween parties
-
Bake sales
-
Trick-or-treat alternatives
-
Kids’ craft days
-
Spooky movie nights
They’re also a great weekend baking project for fall — no spooky season is complete without monsters!
Nutritional & Health Notes
While these are a festive treat, they’re easily portioned and customizable for dietary needs.
-
Portion-controlled: Each one is about 2–3 bites — great for mindful indulging.
-
Easy to make gluten-free or dairy-free: Just use suitable cake and frosting.
-
No artificial preservatives: Especially when using homemade cake and clean frosting.
Enjoy as a holiday treat — they’re more about fun and creativity than perfect nutrition.
FAQs
Do I need a cakesicle mold?
Yes, for the classic shape. Silicone molds are easy to find online and make assembly much easier. You can shape by hand if needed, but it’s trickier.
Can I use store-bought cake and frosting?
Definitely. Box cake or leftover birthday cake works perfectly. Just make sure it’s moist and crumbly.
How long do cakesicles last?
They keep 4–5 days in the fridge in an airtight container. For longer storage, freeze up to 1 month and thaw before serving.
Can I dip them in regular chocolate?
Yes, but use a small amount of coconut oil or shortening to keep the chocolate smooth and easy to work with.
How can I make them allergy-friendly?
Use nut-free frosting, gluten-free cake, and allergen-free chocolate. Avoid toppings with unknown ingredients.
Can kids help make them?
Absolutely. Kids love shaping the cake and decorating the monsters. Just handle the dipping step yourself, as the coating can be hot.
Can I make them ahead of time?
Yes! Make and decorate a day or two in advance. Store chilled and let sit at room temperature for 10 minutes before serving.
Halloween Cakesicles Ideas for Parties

Spooky monster cakesicles are Halloween-ready treats made from crumbled cake and frosting, dipped in colorful chocolate, and decorated like goofy monsters. No baking required!
- Prep Time: 15 minutes
- Cook Time: 0 minutes
- Total Time: 30 minutes
- Yield: 10–12 cakesicles 1x
Ingredients
3 cups crumbled cake (chocolate, vanilla, or red velvet)
⅓–½ cup frosting (buttercream, cream cheese, etc.)
1½ cups candy melts or chocolate coating
1 tsp coconut oil (optional)
Candy eyes, sprinkles, edible markers
12 cakesicle sticks
Instructions
-
Crumble cake and mix with frosting until dough-like.
-
Press mixture into cakesicle molds and insert sticks. Freeze 10–15 minutes.
-
Melt candy melts in microwave in 20-sec intervals, stirring between. Add coconut oil if needed.
-
Remove cakesicles from molds and dip into coating. Let excess drip off.
-
Decorate with eyes and sprinkles while wet.
-
Chill or set at room temp until firm.
-
Use edible markers to draw spooky faces.
Notes
Use moist cake for best results.
Store in fridge for up to 5 days or freeze.
Let kids help decorate for extra fun.