

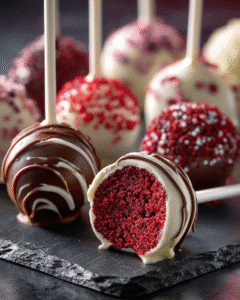
Bring a touch of elegance and fun to your dessert table with these Red Velvet Cake Pops—moist red velvet cake blended with cream cheese frosting, rolled into bite-sized balls, and dipped in a crisp white chocolate shell. Whether you’re prepping for a party, holiday gift box, or just looking for a whimsical treat, these cake pops are as charming as they are delicious.
Red velvet cake pops have become a staple in coffee shops and bakeries thanks to their rich flavor, beautiful color, and handheld convenience. They combine the best of two dessert worlds: the decadent texture of cake and the fun portability of candy.
Their signature red color and creamy tang come from classic red velvet cake—made with a hint of cocoa and buttermilk—while cream cheese frosting binds everything together into a truffle-like bite. Once dipped in chocolate and decorated, they’re irresistible little treats that disappear fast.
Ideal for weddings, birthdays, Valentine’s Day, or even Christmas cookie boxes, red velvet cake pops are as versatile as they are show-stopping.
Ingredients Overview
To make red velvet cake pops, you’ll start with a fully baked cake (either from scratch or a box), then crumble and mix with frosting. Here’s how each ingredient contributes:
Red Velvet Cake
You can use a homemade recipe or a box mix. Red velvet cake is slightly tangy, subtly chocolaty, and dyed a brilliant red. It’s moist, soft, and crumbles perfectly for cake pops.
Cream Cheese Frosting
This binds the cake crumbs and adds rich, tangy flavor that balances the sweetness. You only need enough to hold the crumbs together—not to make the mixture overly wet.
White or Dark Chocolate (for coating)
Candy melts or high-quality baking chocolate are best for dipping. White chocolate contrasts beautifully with the red filling, while dark chocolate adds rich depth.
Vegetable Oil or Shortening (Optional)
Adding a teaspoon or two to melted chocolate creates a thinner coating that’s easier to dip.
Lollipop Sticks
These turn your cake truffles into party-ready pops! You can also serve them as truffles without sticks if preferred.
Decorations (Sprinkles, Drizzle, Colored Sugar)
To personalize your pops for any event, finish with colored sugar, metallic sprinkles, or chocolate drizzle.
Step-by-Step Instructions
These cake pops are easy, but do require some chilling and patience. Here’s how to make them like a pro:
1. Bake the Cake
-
Prepare a red velvet cake using your favorite recipe or a box mix (typically in a 9×13-inch pan). Let it cool completely.
2. Crumble the Cake
-
Once cooled, break the cake into large chunks and crumble it finely into a large bowl using your hands or a fork.
3. Mix with Frosting
-
Add about ½ to ¾ cup of cream cheese frosting to the crumbs. Start with less and add more as needed. Mix until it holds together like playdough when squeezed.
4. Form the Balls
-
Roll the mixture into 1-inch balls (about 1 tablespoon each). Place on a parchment-lined tray. You should get 24–30 cake balls depending on size.
5. Chill the Balls
-
Refrigerate for 2 hours or freeze for 30 minutes. This step is key for keeping the cake pops on the stick during dipping.
6. Insert Sticks
-
Dip the tip of each stick into melted chocolate, then push it halfway into each cake ball. This helps secure the stick. Chill again for 10–15 minutes to firm up.
7. Melt the Coating Chocolate
-
In a microwave-safe bowl, melt the white or dark chocolate in 30-second bursts, stirring between each, until smooth. Stir in 1–2 tsp vegetable oil if needed to thin.
8. Dip the Cake Pops
-
Hold each cake pop by the stick and dip into the melted chocolate. Gently tap off excess coating by rotating the pop and lightly tapping your wrist. Place upright in a styrofoam block or cake pop stand to set.
9. Decorate
-
Before the chocolate sets, add sprinkles or drizzle with contrasting chocolate. Let the pops harden completely at room temperature.
Tips, Variations, and Substitutions
Tips for Success
-
Don’t overuse frosting: Too much makes the cake balls greasy and hard to coat.
-
Keep them cold: Chilled cake balls dip more cleanly and stay on the sticks.
-
Use high-quality chocolate: For smooth coating and better flavor, use chocolate designed for melting (like Ghirardelli melts or Wilton Candy Melts).
Variations
-
Holiday Pops: Use themed sprinkles—red and green for Christmas, pink for Valentine’s Day, silver and blue for New Year’s.
-
Mini Cake Truffles: Skip the sticks and serve them as chocolate-covered bites.
-
Surprise Center: Add a mini marshmallow or piece of chocolate inside each ball for a hidden filling.
Substitutions
-
Frosting: Can be swapped with store-bought vanilla or chocolate if you don’t have cream cheese frosting.
-
Chocolate Coating: Use almond bark, dark chocolate chips, or dairy-free chocolate for dietary needs.
-
Cake Flavor: Try this technique with chocolate, vanilla, or carrot cake for other themed pops.
Serving Ideas & Occasions
Red velvet cake pops are ideal for occasions where presentation matters:
-
Wedding Showers: Serve in white and gold wrappers with pearl sprinkles.
-
Birthday Parties: Display in bouquets or themed trays.
-
Valentine’s Day: Add heart-shaped sprinkles or wrap in red foil.
-
Gift Boxes: Pack in cellophane bags tied with ribbon for edible gifts.
-
Dessert Tables: Pair with cupcakes, cookies, and fruit for a complete spread.
These also make great favors or place settings—just attach a personalized name tag!
Nutritional & Health Notes
Cake pops are indulgent by design, but they’re also portion-controlled. Here’s how they fit into your dessert lineup:
-
Smaller Serving Size: Each pop is around 100–150 calories—much less than a full slice of cake.
-
Customizable Ingredients: Use lighter frosting, natural food dyes, or lower-sugar options.
-
Allergen Friendly: Easily adaptable for gluten-free or dairy-free diets with cake mix and chocolate swaps.
-
Balanced with Fruit: Serve alongside fresh berries for a visually appealing and flavorful pairing.
In moderation, they make a delightful treat that looks just as good as it tastes.
Frequently Asked Questions
1. Can I use store-bought red velvet cake?
Yes! You can use a bakery cake or boxed cake mix. Just make sure it’s completely cooled before crumbling.
2. Why are my cake pops falling off the stick?
Most likely, the cake balls were too warm or too soft. Chill them thoroughly and dip the stick in melted chocolate before inserting—it acts as glue.
3. Can I make cake pops ahead of time?
Absolutely. You can prepare and shape the cake balls up to 2 days in advance and keep them refrigerated. Dipped pops can be stored for 3–4 days.
4. Do I need a cake pop stand?
A stand makes it easier to keep the pops upright while they set, but you can use a styrofoam block, an egg carton, or even a colander turned upside down.
5. Can I freeze cake pops?
Yes. Freeze uncoated cake balls for up to 2 months. Thaw in the fridge before dipping. You can also freeze completed pops, but they may sweat when thawing.
6. What kind of chocolate should I use for dipping?
Candy melts or almond bark work best for smooth coating. If using regular chocolate chips, add a bit of vegetable oil to help thin the mixture and prevent cracking.
7. How do I get a smooth, shiny finish?
Use candy melts or tempered chocolate, and tap off excess coating gently. Don’t refrigerate them after dipping—let them set at room temperature to avoid condensation.
Tasty Recipes Card
Description:
Moist red velvet cake mixed with cream cheese frosting, rolled into bite-sized pops, and dipped in silky chocolate coating. Perfect for parties, gifts, or themed events.
Ingredients:
-
1 red velvet cake (from box or homemade, 9×13 size)
-
½ to ¾ cup cream cheese frosting
-
12 oz white or dark chocolate, chopped or candy melts
-
1–2 tsp vegetable oil (optional, for thinning chocolate)
-
Lollipop sticks
-
Sprinkles or decorations (optional)
Instructions:
-
Bake and cool red velvet cake. Crumble finely in a large bowl.
-
Add frosting a little at a time until the mixture holds together when pressed.
-
Roll into 1-inch balls and place on parchment-lined tray. Chill for 2 hours.
-
Dip lollipop sticks into melted chocolate, insert into cake balls. Chill again 15 minutes.
-
Melt chocolate in 30-second intervals, stirring until smooth.
-
Dip each pop, tap off excess, and decorate. Let set upright.
-
Allow chocolate to set completely before serving or packaging.
Notes:
-
Use gloves for red velvet to avoid staining hands.
-
Freeze unfrosted cake balls for later dipping.
-
Store completed pops in airtight container at room temperature.
Details:
Prep Time: 30 minutes
Chill Time: 2 hours
Total Time: 2½ hours
Yield: 24–30 cake pops