
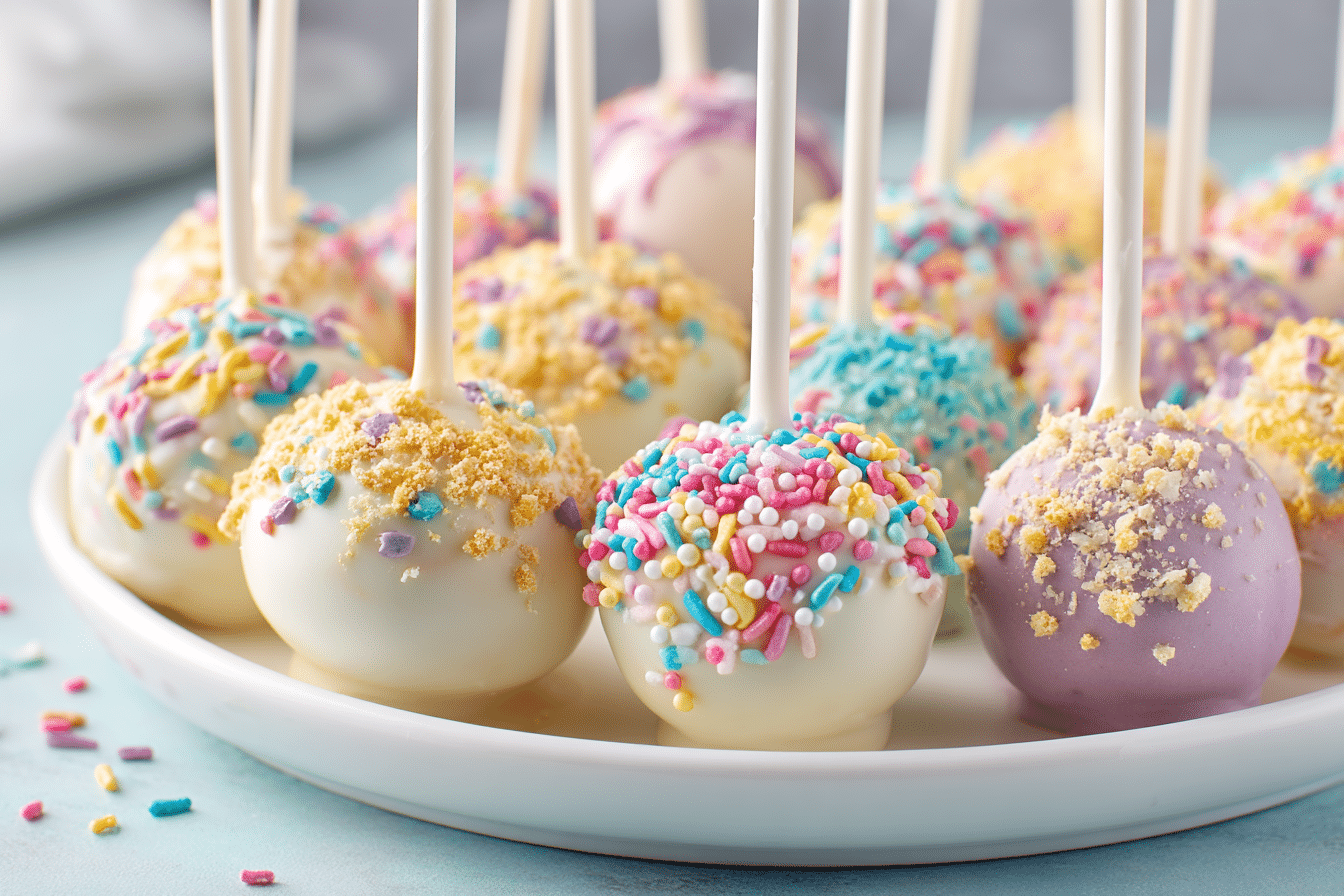
There’s something irresistibly nostalgic about Starbucks Birthday Cake Pops—the soft pink coating, the buttery vanilla cake center, and that adorable pop-on-a-stick presentation. If you’ve ever wondered how to recreate that signature taste and texture at home, you’re in the right place. These Starbucks copycat birthday cake pops are a dream come true for anyone who loves cake in bite-sized form.
The beauty of this recipe is in its simplicity. A rich vanilla cake is crumbled and mixed with frosting to create a dough-like consistency, rolled into balls, and dipped in a sweet candy coating. What makes this version stand out is the balance of sweetness, the real vanilla flavor, and the perfectly moist texture that doesn’t crumble or fall apart when you bite into it.
Whether you’re planning a birthday party, baby shower, or just want a fun baking project, these cake pops bring joy to any occasion. Let’s get into exactly how to make the best Starbucks copycat birthday cake pops right in your own kitchen.
Ingredients Overview
Vanilla Cake
A classic vanilla cake forms the base of these cake pops. You can use a homemade version or a quality boxed mix if you’re short on time. The key is to make sure the cake is light yet moist. Too dry, and the pops won’t hold together well; too dense, and they’ll be heavy and overly rich.
Frosting
Buttercream is the go-to frosting for binding the cake crumbs together. It adds both moisture and sweetness. You’ll only need a small amount—just enough to make the cake crumbs stick together. Use homemade vanilla buttercream or a good store-bought version. Cream cheese frosting works too, though it gives a slight tangy flavor.
White Candy Melts
These provide the smooth, glossy shell around each cake pop. Candy melts are designed to coat evenly and harden quickly. If you don’t have access to them, white chocolate chips with a bit of coconut oil make a good substitute, though they may be slightly softer.
Pink Food Coloring
To replicate that signature Starbucks look, pink food coloring is essential. Gel coloring works best for vibrancy without affecting the texture of the coating.
Lollipop Sticks
These turn the cake balls into pops. Make sure they’re sturdy enough to hold the weight of each cake ball without bending.
Sprinkles
Optional but delightful, sprinkles add texture and festive flair. Go for rainbow jimmies, nonpareils, or even heart-shaped confetti for a themed touch.
Substitutions
If you’re avoiding dairy, use a plant-based cake and frosting. Gluten-free cake mixes work well too, though they tend to be more crumbly—add a little extra frosting if needed. For a lower-sugar option, use sugar-free cake mix and frosting, and dip in unsweetened melted chocolate.
Step-by-Step Instructions
Step 1: Bake the Cake
Prepare your vanilla cake according to the recipe or package instructions. Let it cool completely. This step is important—if the cake is even slightly warm, the frosting will melt and create a mushy texture.
Step 2: Crumble the Cake
Once fully cooled, break the cake into chunks and place them in a large mixing bowl. Use your hands or a fork to crumble it finely. There should be no large pieces remaining.
Step 3: Add Frosting
Start with 2–3 tablespoons of frosting and mix it into the cake crumbs using a spatula or clean hands. Add more frosting one tablespoon at a time until the mixture holds together when pressed. You’re aiming for a dough-like texture that’s moist but not sticky.
Step 4: Roll Into Balls
Scoop about 1.5 tablespoons of the mixture and roll it into a smooth ball. Repeat with the remaining mixture and place the balls on a parchment-lined baking sheet.
Step 5: Chill the Cake Balls
Place the cake balls in the refrigerator for at least 2 hours or the freezer for 30 minutes. This helps them firm up and stay intact during dipping.
Step 6: Insert the Sticks
Melt a small amount of candy melts and dip the tip of each lollipop stick into it before inserting it halfway into each cake ball. This acts as a glue, keeping the stick secure.
Step 7: Melt the Candy Coating
Melt the white candy melts in a microwave-safe bowl in 30-second intervals, stirring between each. Once smooth, stir in pink food coloring to reach your desired shade.
Step 8: Dip and Coat
Working one at a time, dip each cake pop into the melted coating, gently turning to coat evenly. Tap off excess gently by rotating the pop while holding it at an angle.
Step 9: Decorate and Dry
Add sprinkles before the coating hardens. Stand each pop upright in a styrofoam block or cake pop stand to dry completely.
Common Mistakes to Avoid
-
Using too much frosting will make the cake pops too soft.
-
Dipping when the cake balls are too warm will cause them to fall off the stick.
-
Overheating candy melts can cause them to seize. Stir frequently and heat gently.
Tips, Variations & Substitutions
Tips for Success
-
Use gel food coloring for vibrant results without thinning the candy coating.
-
If your coating is too thick, stir in a teaspoon of coconut oil.
-
Chill thoroughly before dipping to prevent cake pops from sliding off the sticks.
Flavor Variations
-
Use funfetti cake and vanilla frosting for extra color inside.
-
Try chocolate cake with cream cheese frosting for a rich twist.
-
Add a dash of almond or lemon extract to the cake mix for subtle flavor upgrades.
Dietary Swaps
-
Use gluten-free cake mix and dairy-free frosting for a gluten- and dairy-free option.
-
Substitute sugar-free frosting and cake mix to reduce sugar content.
-
Vegan buttercream and egg substitutes work beautifully in the cake base.
Serving Ideas & Occasions
These birthday cake pops are perfect for parties, bake sales, baby showers, and holiday treat tables. Their small size makes them easy to serve and ideal for portion control.
Serve them as part of a dessert spread with cupcakes, cookies, and fruit platters. They also pair well with vanilla milkshakes, iced lattes, or strawberry lemonade for a café-style experience at home.
Wrap them individually in clear bags with ribbons for party favors, or present them in a decorative box as a sweet gift.
They also make delightful additions to school lunchboxes or after-school treats.
Nutritional & Health Notes
Cake pops are a treat, so they’re naturally sweet and calorie-dense. Each pop typically contains around 160–200 calories, depending on the size and ingredients used.
They offer minimal nutritional value but a big emotional payoff. For a slightly lighter version, reduce the amount of frosting used and opt for a thinner candy coating.
You can also use a protein-enriched cake mix or frosting, but the flavor and texture may vary slightly.
If food coloring is a concern, look for natural dyes made from beet or berry extracts.
As with any dessert, moderation is key. A single cake pop makes for a satisfying, portion-controlled indulgence.
FAQs
1. Can I make cake pops in advance?
Yes, you can make the cake balls up to 2 days ahead and store them in the fridge. Once coated, they can last up to 5 days at room temperature in an airtight container.
2. Why do my cake pops fall off the stick?
This usually happens if the cake balls are too warm or too soft. Make sure they are thoroughly chilled and that you’ve dipped the stick in melted coating before inserting.
3. What can I use instead of candy melts?
White chocolate chips mixed with a teaspoon of coconut oil work well. Be aware that white chocolate doesn’t harden as firmly as candy melts, so handle with care.
4. How do I get a smooth coating on my cake pops?
Use a tall, narrow cup for dipping to fully submerge the cake pop. Let excess drip off while gently twirling to avoid streaks and bubbles.
5. Can I freeze cake pops?
Yes, freeze the uncoated cake balls in an airtight container for up to 2 months. Thaw in the fridge before dipping. Freezing the finished, coated pops isn’t recommended, as the coating may crack.
6. Can I make these without a cake pop stand?
Yes, use an upside-down egg carton, a block of styrofoam, or even a colander turned upside down to hold the sticks upright while drying.
7. Are these cake pops good for kids to help with?
Absolutely. Kids can help roll the balls, dip them, and add sprinkles. Just supervise during the melting and dipping steps, as the coating will be hot.
Starbucks Copycat Birthday Cake Pops Recipe Everyone Loves
These Starbucks copycat birthday cake pops feature soft vanilla cake blended with frosting, dipped in a pink candy coating, and topped with sprinkles. A party-perfect, handheld treat.
- Prep Time: 30 minutes
- Cook Time: 30 minutes
- Total Time: 3 hours (includes chilling)
- Yield: 24 cake pops 1x
Ingredients
1 box vanilla cake mix (plus ingredients to prepare)
1/2 cup vanilla buttercream frosting
12 oz white candy melts
Pink gel food coloring
Lollipop sticks
Sprinkles (optional)
Instructions
-
Bake vanilla cake according to package directions. Let cool completely.
-
Crumble cake into a large bowl.
-
Mix in frosting a tablespoon at a time until dough forms.
-
Roll into 1.5-inch balls and place on parchment-lined tray.
-
Chill for 2 hours in the fridge or 30 minutes in the freezer.
-
Dip lollipop stick tips in melted candy coating and insert into each ball.
-
Melt candy melts in 30-second intervals, stirring until smooth.
-
Stir in pink gel coloring.
-
Dip each cake pop into coating and tap off excess.
-
Add sprinkles before coating hardens.
-
Stand upright in foam block to dry completely.
Notes
Use gel coloring for best results. Chill pops thoroughly before dipping to prevent slipping. Store in an airtight container at room temperature for up to 5 days.